
Overview
This tutorial comprises the following sections:
Section 1: Preparation
Embark on your AR journey by learning to download essential project files and open them in Unity.
Section 2: Scene Setup and Basic AR Components
Dive into Unity's Scene concept, crafting your very own Scene. Discover the fundamental components necessary for building AR experiences, including XR Origin and AR Session.
Section 3: Exploring Prefabs
Delve into the Unity's Prefab concept. Uncover valuable insights into the provided Prefabs featured in this lesson.
Section 4: Placing Virtual Objects in Real-World Environments
Master the art of utilizing the AR Raycast Manager to detect and actively position virtual objects within real-world environments.
Section 5: Unveiling Hand-Tracking Magic
Experience the magic of HoloKit's Hand Tracking functionality. Elevate your application by introducing natural interaction.
Section 6: Creating Your SceneManager
Learn about Unity's SceneManager and create a customized version to efficiently manage your scenes.
Section 7: Immersive Soundscapes
Enhance the overall immersion of your scene by integrating background music and sound effects.
Section 8: Test Run in Play Mode
Before taking your creation to mobile devices, test it within the Unity editor to ensure a seamless experience.
Section 9: Building for Mobile Devices
Collaborate to transfer your scene onto mobile devices and witness the results of your AR journey.
This tutorial will equip you with the skills needed to create holographic AR applications. Let's dive into this thrilling learning journey!
Section 1:Preparation
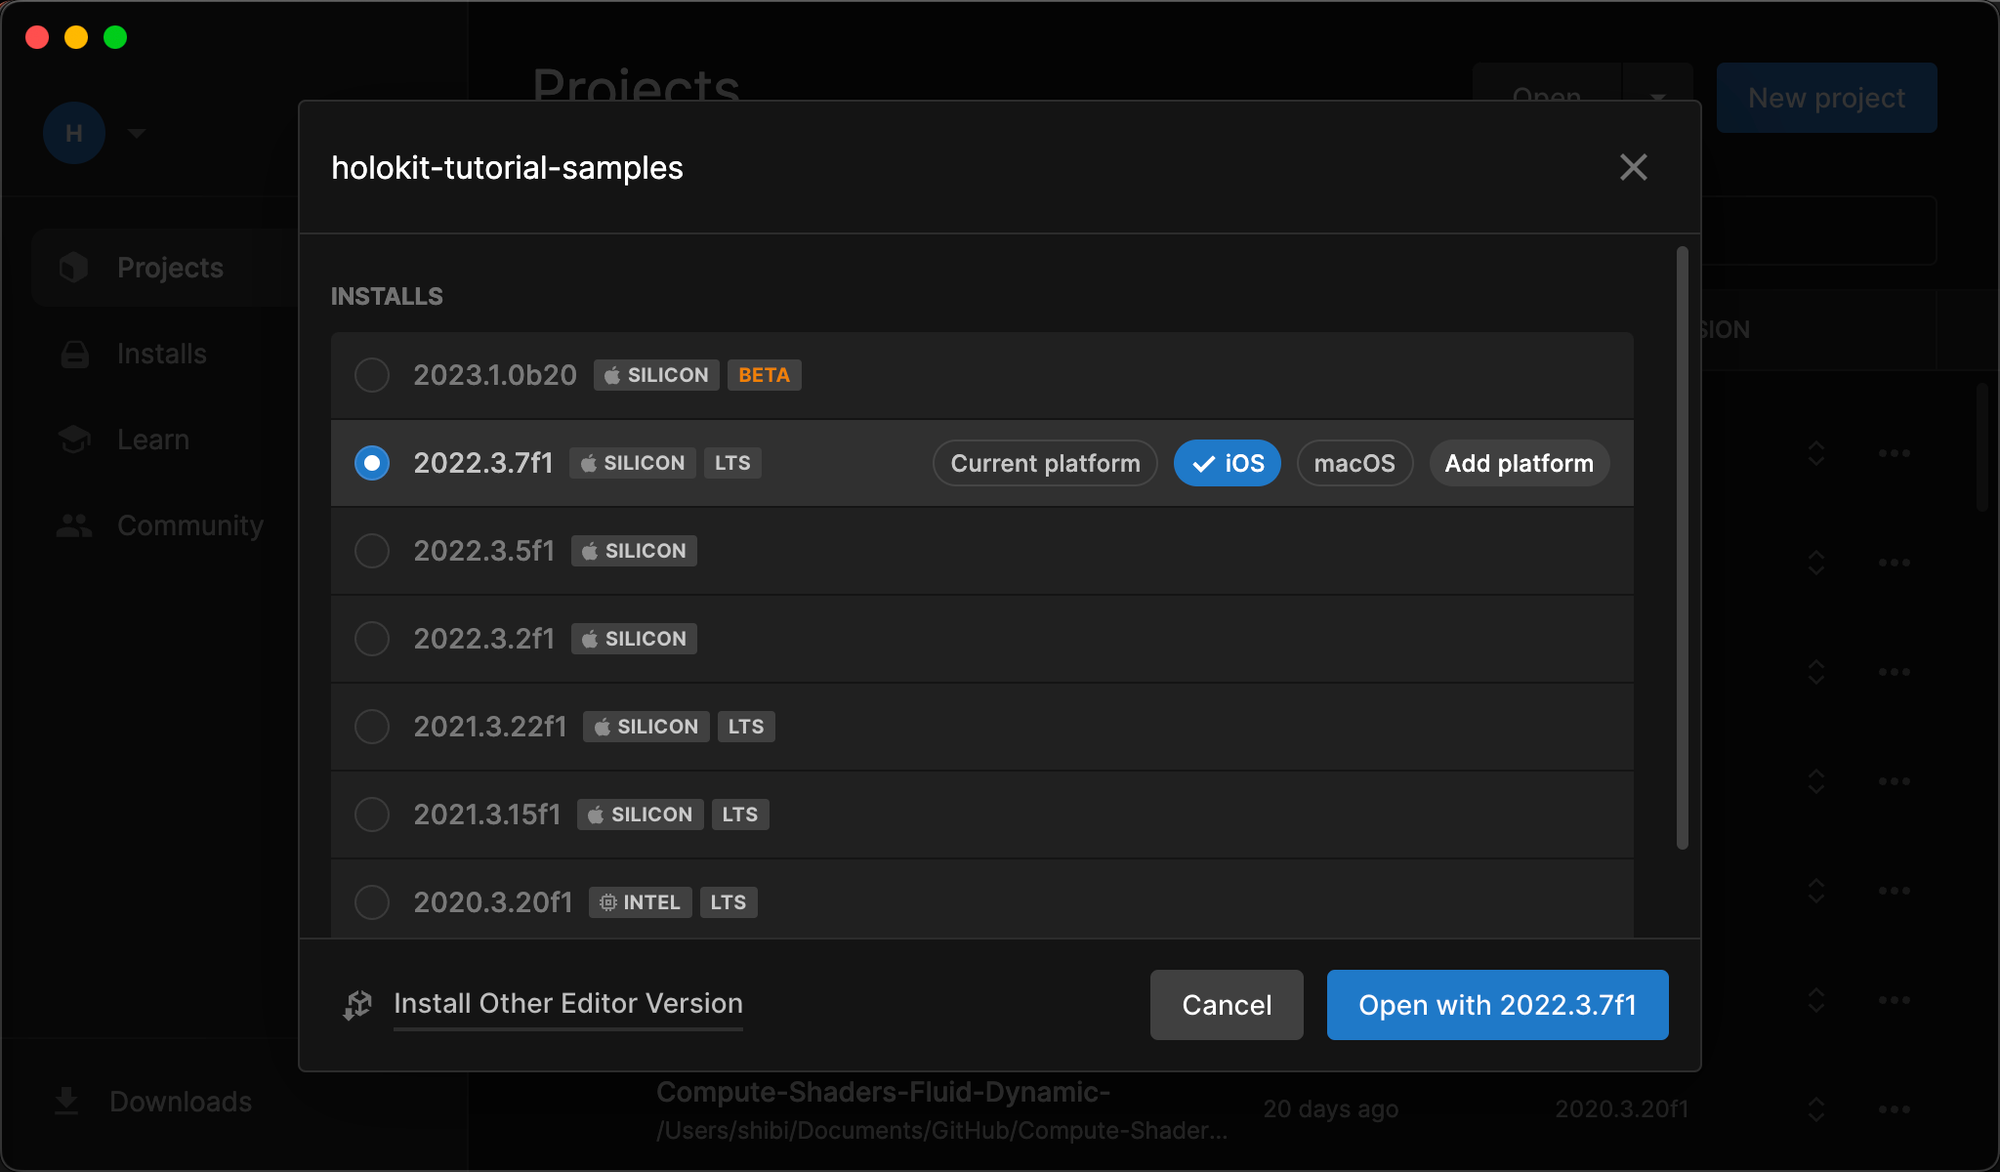
Set Up Unity
The course's accompanying project uses Unity 2022.3.7f1. We recommend you download this version.
Working with other versions of Unity may leads to compatibility issues.
Download the Course Project
In this tutorial, we will provide a Git project, which is a Unity project containing all the necessary assets and an implemented scene.
We will use this project as our starting point, following the tutorial step by step, to gradually build our own application.
To begin, head over to the project's GitHub page:
https://github.com/holoi/holokit-tutorial-samples
There are two ways to download this project, choose either one:
-
Click the green button to download the zip file. Once the download is complete, locate the compressed file and extract it.
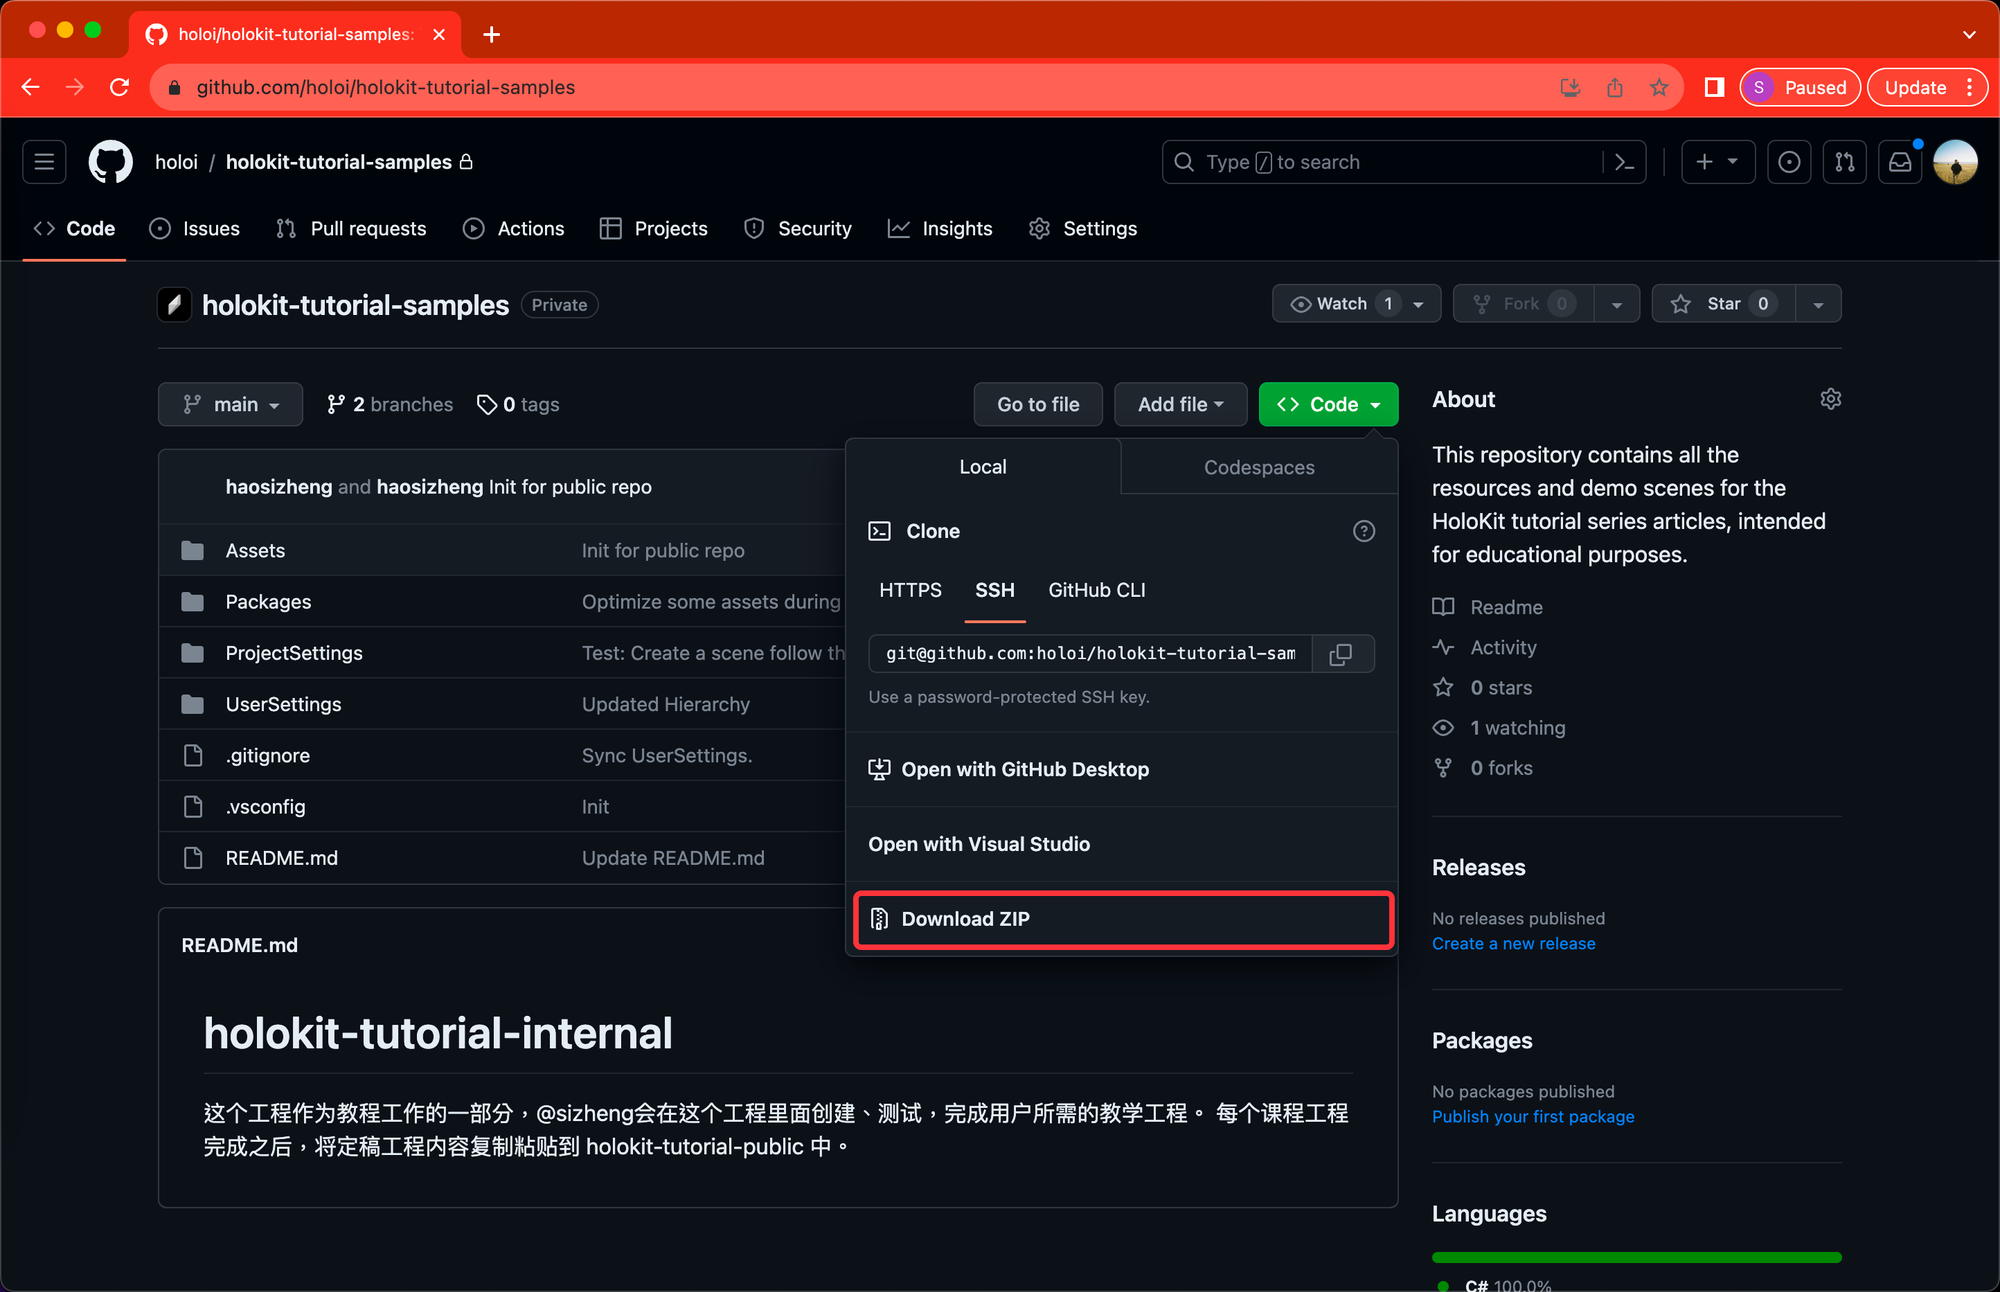
Click on the download to start the download process -
If you are familiar with Git, clone this project on your own.
Open the Project
Once the download is complete, open Unity Hub. Click “Open” to select the appropriate folder.
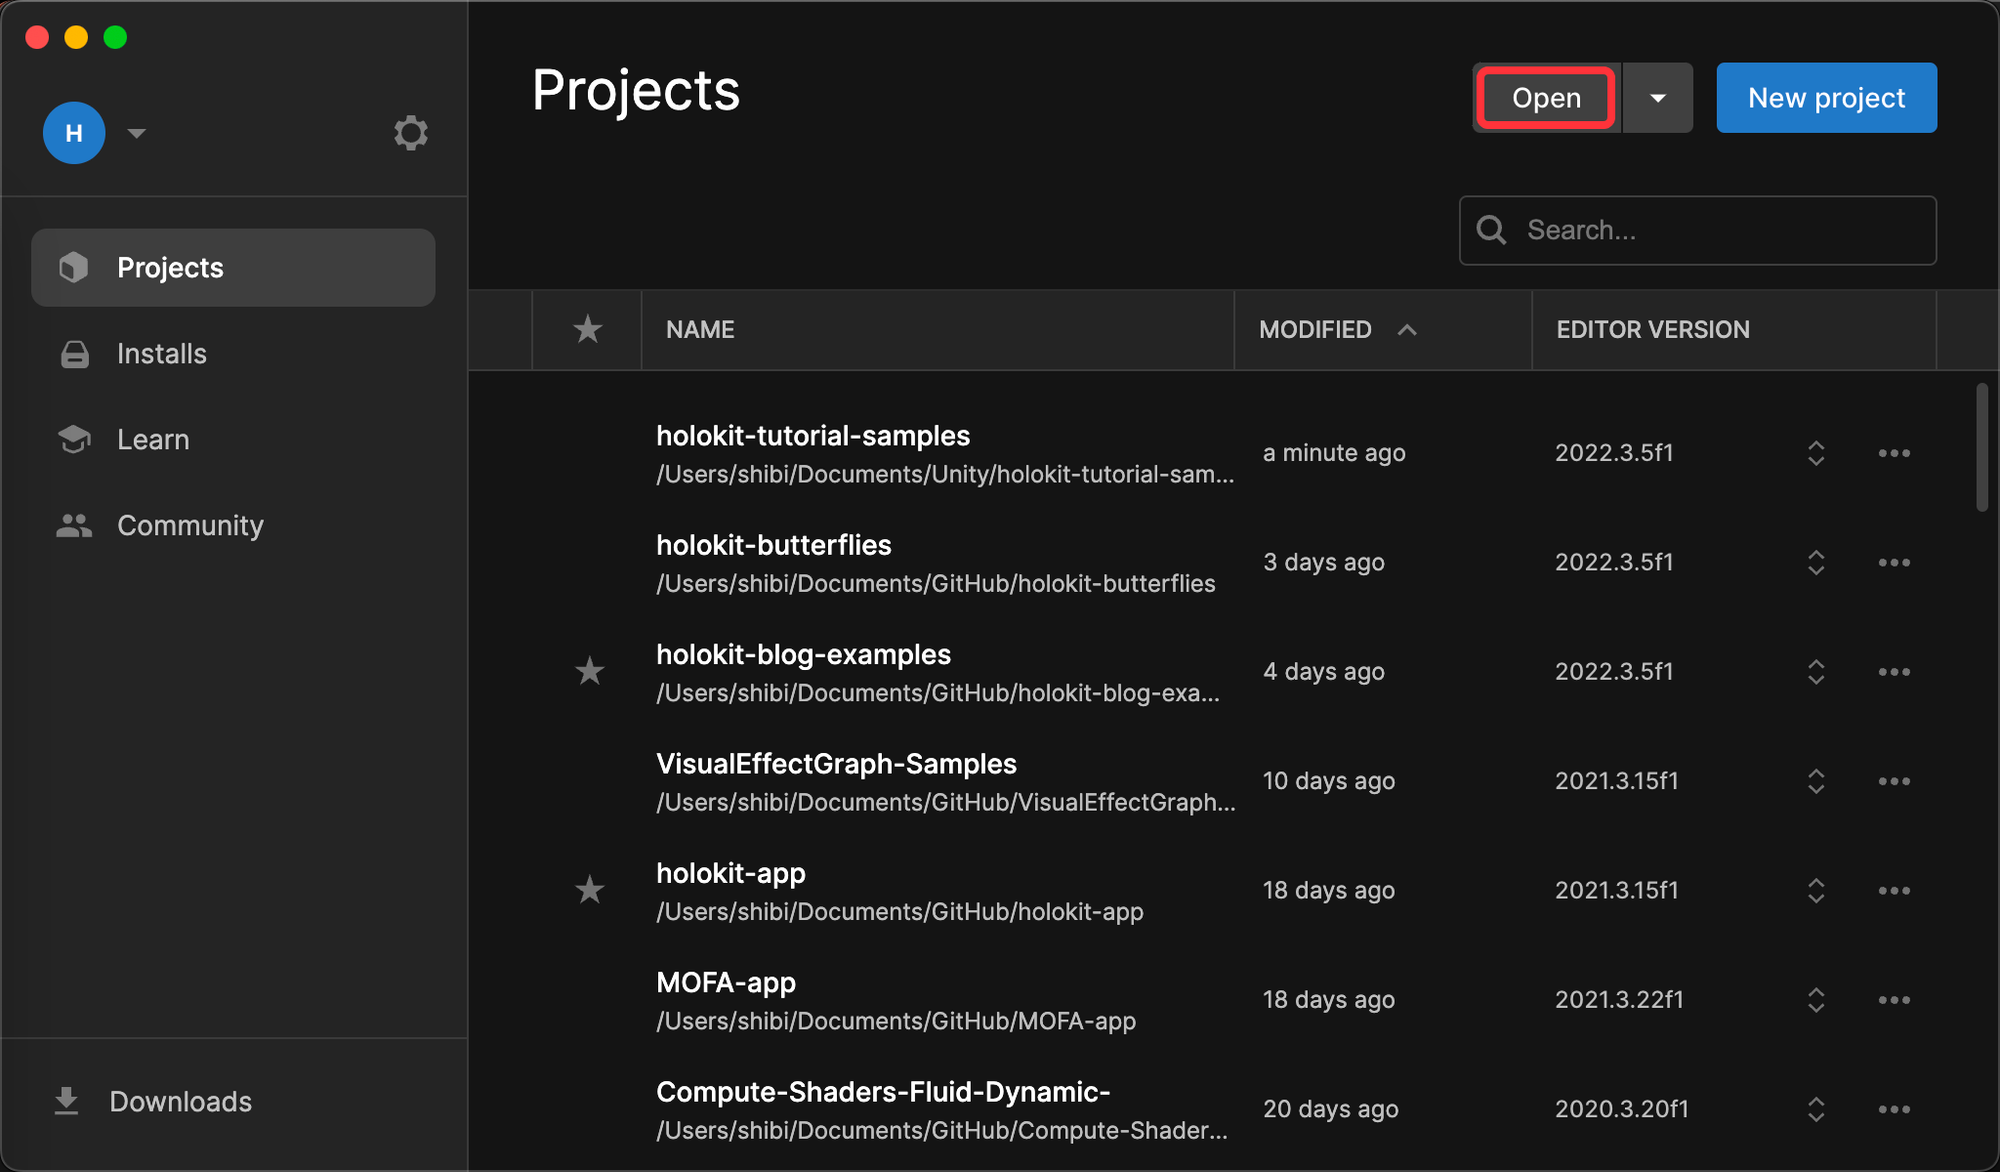
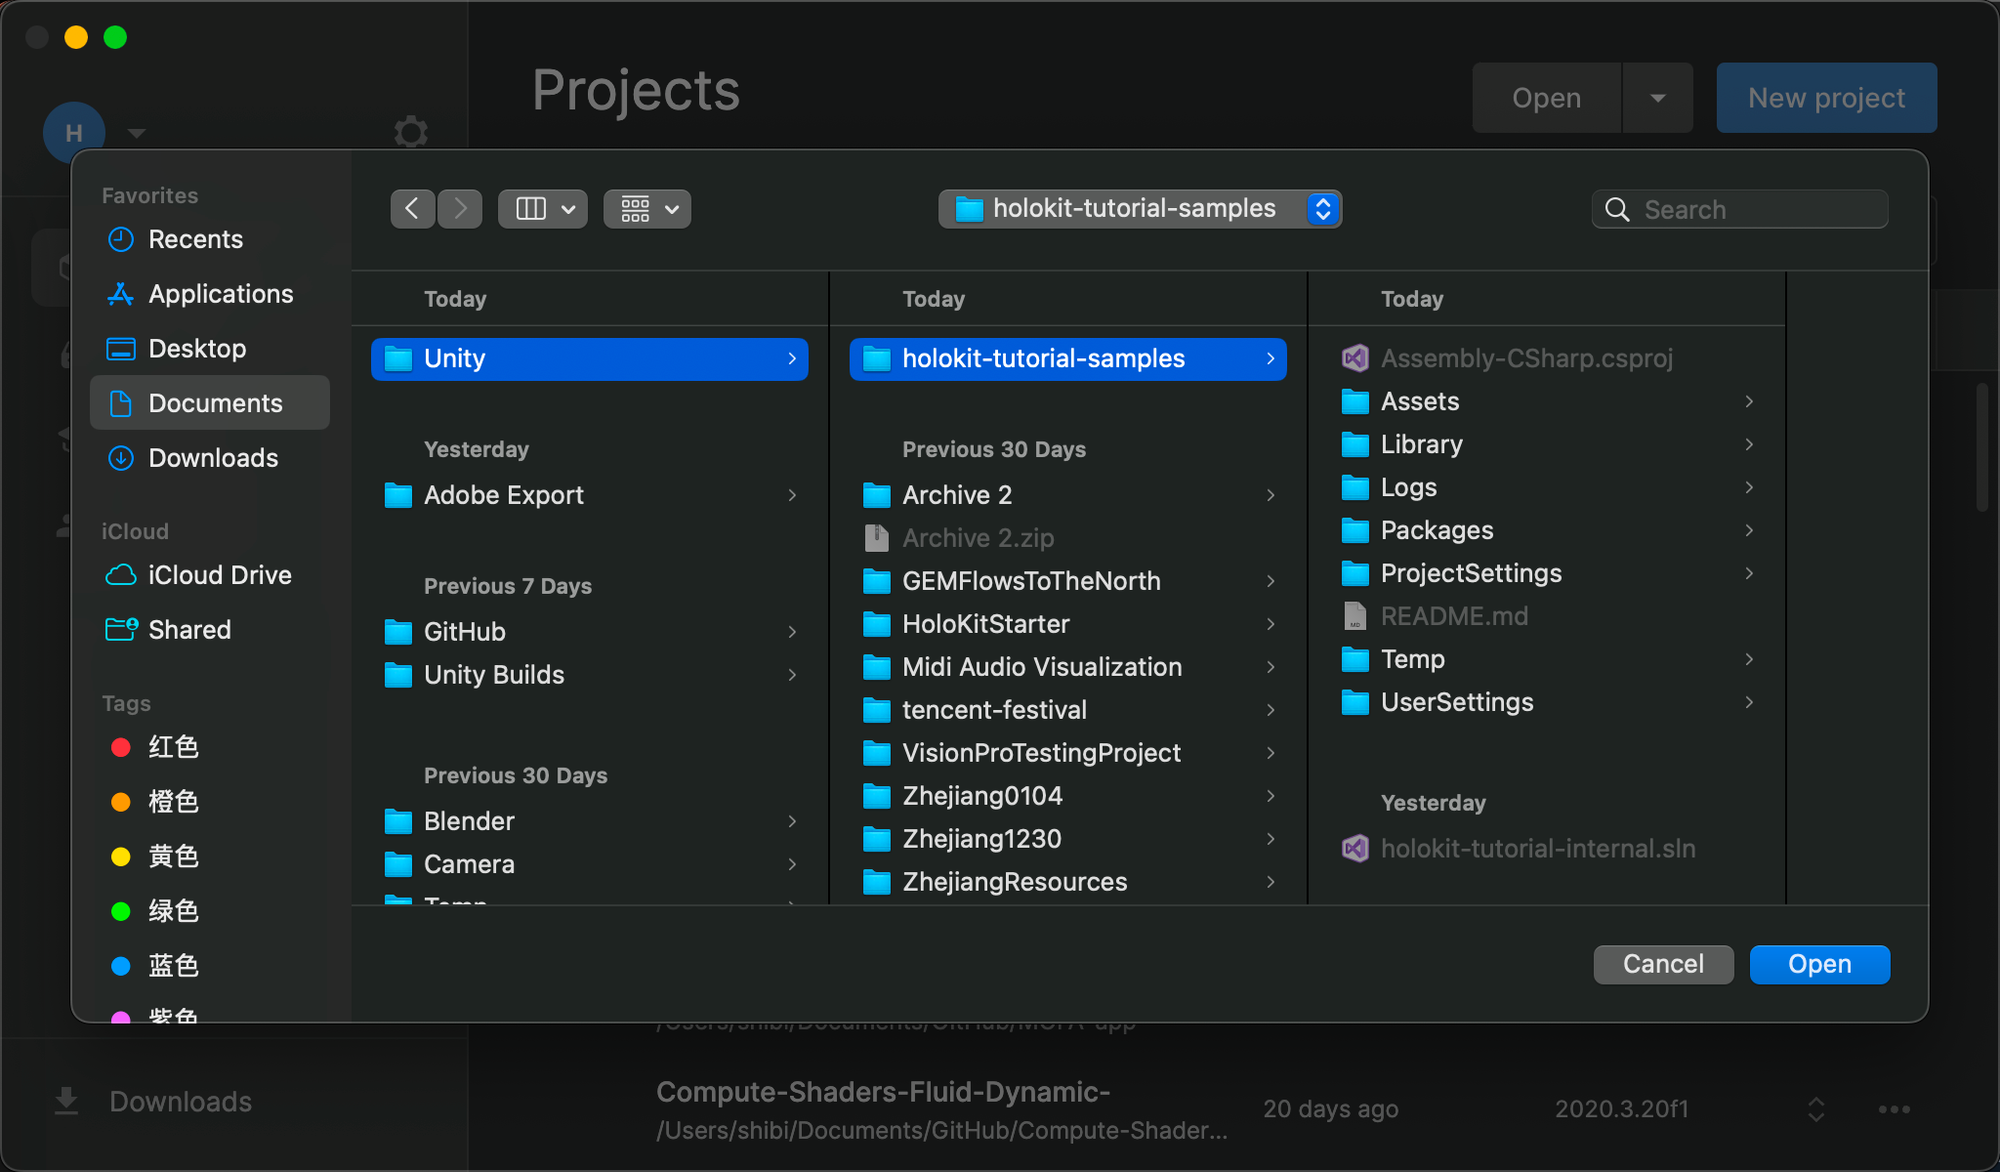
Wait for Unity to open.
Configuring Unity Layout
Before delving into the creation of our AR app, we suggest utilizing the "holokit-layout" that we've provided. This layout encompasses all essential windows to ensure a comprehensive workflow.
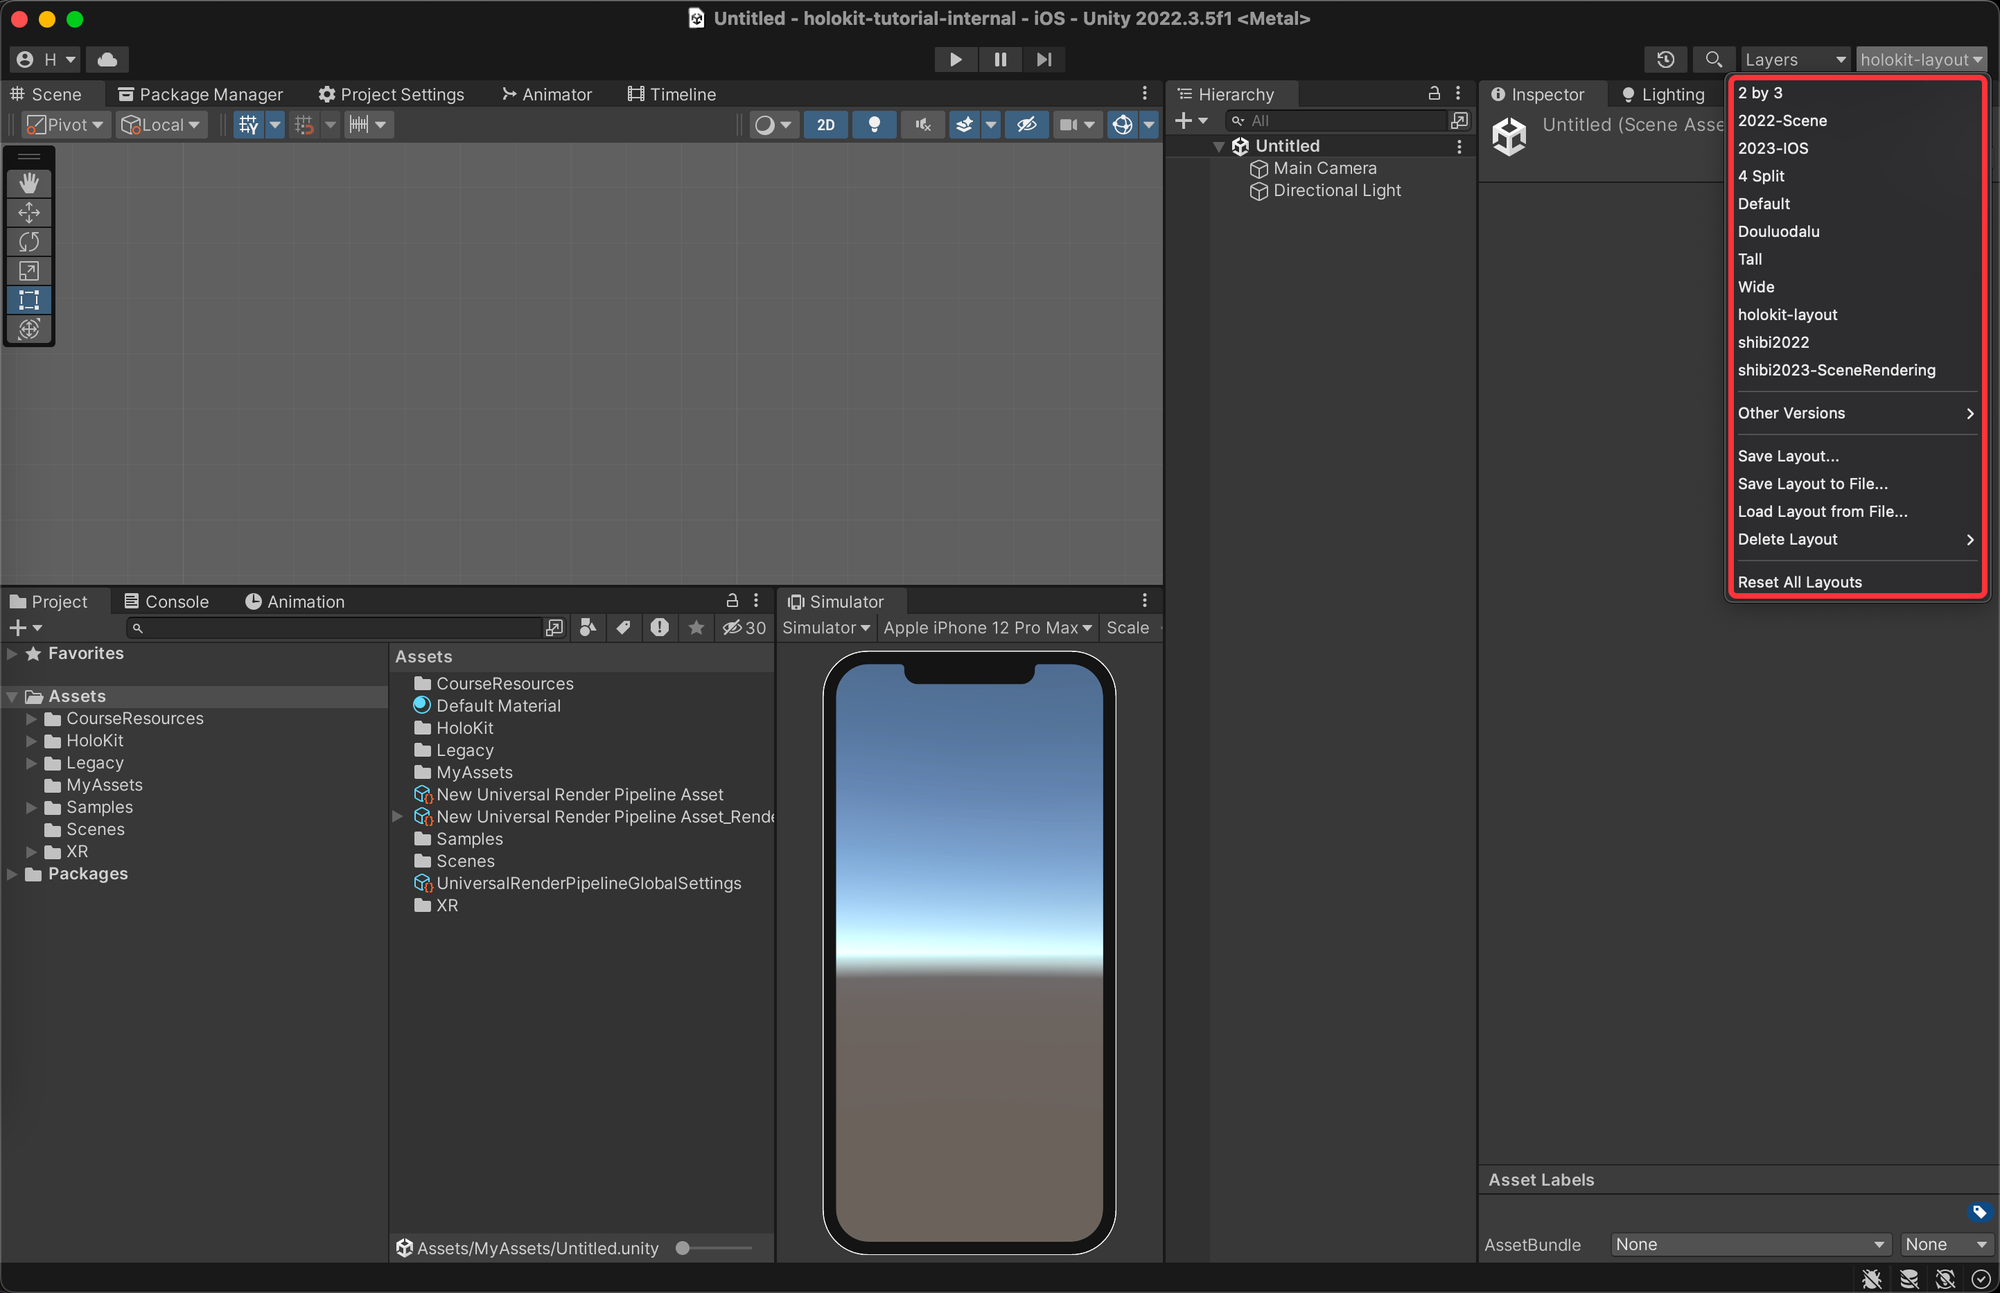
All set, let's dive into MR development with this layout at our fingertips.
Section 2: Setup scene and basic AR component
Scene Creation
In Unity, a "Scene" is a fundamental building block that encapsulates a distinct environment within your project. It serves as a self-contained space where you design and construct specific aspects of your game or application. Think of it as a contained setting, much like a chapter in a story, where you create and organize various elements to achieve your desired experience.
Here's how we dive into the action:
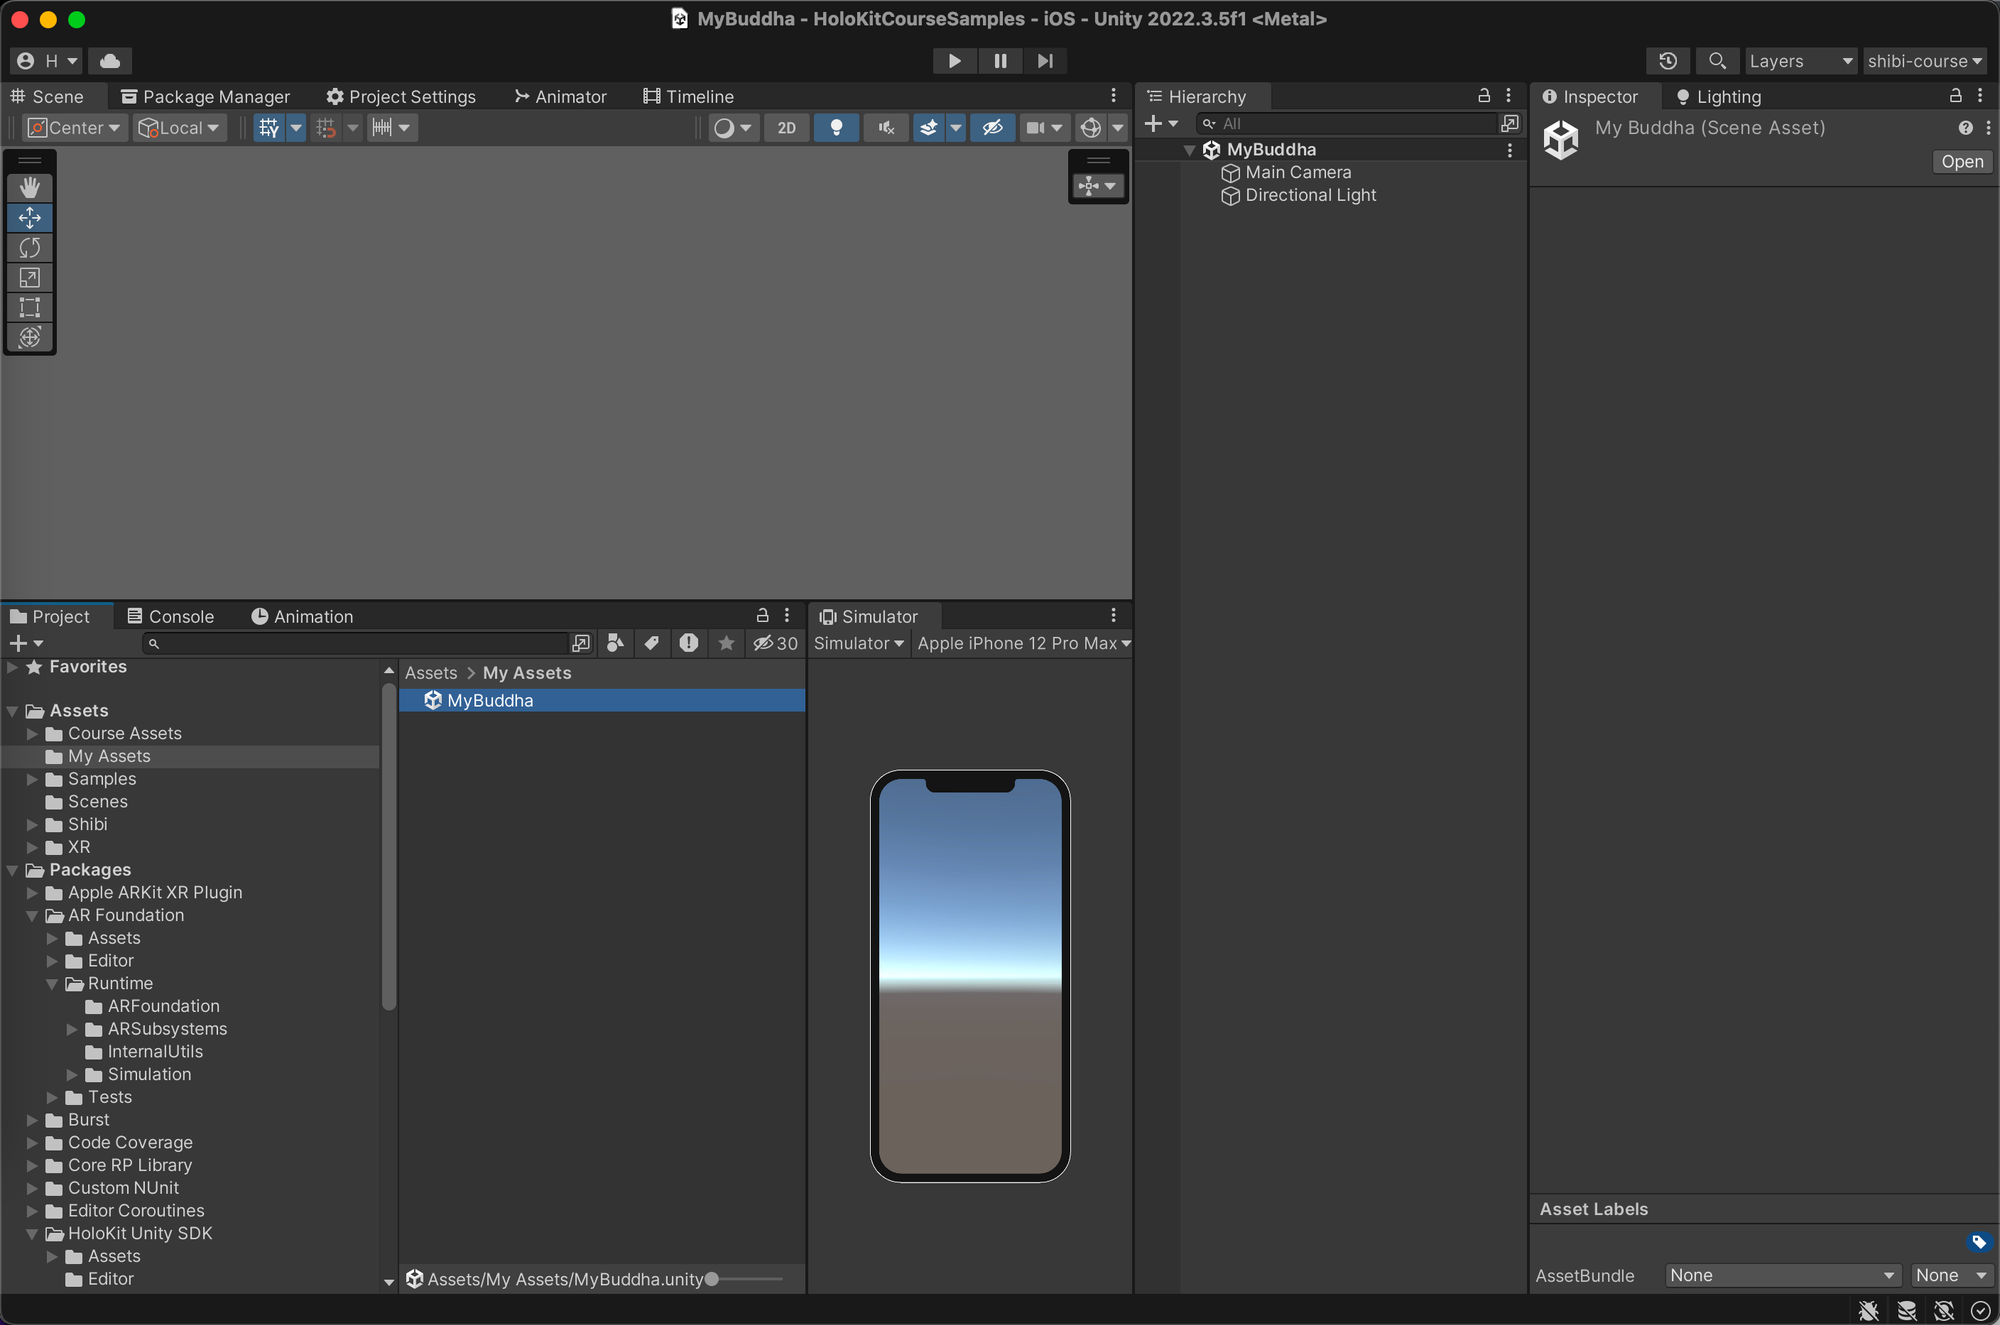
- Locate the Project Window. You can find it on the bottom left of the Unity editor.
- Click on the "My Assets" folder in the Project Window to select it.
- Right-click and hover over the ”Create” option in the context menu, then select ”Scene” from the submenu. This will create a new empty scene in the project.
- Right-click, select “Rename”, to rename it to “Buddha”
- Double-click it to open.
After opening it, you'll notice a default skybox in the Simulator Window as the following image shows.
Next, let's remove all the objects in the Hierarchy Window, including the Camera and Directional Light, for the following reasons:
- We won't be needing the default camera as we'll create new cameras for the Mixed Reality (MR) experience.
- The Directional Light is unnecessary because we won't be illuminating any objects in this tutorial.
Integrating AR Session and XR Origin
When it comes to Augmented Reality (AR) development, Unity's AR Session and XR Origin play
crucial roles:
AR Session is one of the primary components in Unity used to manage the AR experience. In essence, it
forms the foundation for developing AR applications in Unity, providing interfaces with AR hardware
devices and tracking systems, as well as managing interactions between virtual content and the real
world.
💡 AR hardware devices Includes sensors such as gyroscope, accelerometer, magnetometer, and camera. These sensors can be used to obtain information about the device's orientation, direction, acceleration, and position.
XR Origin is a virtual coordinate system used to define the origin point and axis directions in VR or AR
scenes. Understanding and correctly setting up the XR Origin are essential to ensure proper positioning and movement
of XR applications in VR or AR. Unless there are specific requirements, always remember to keep the object XR
Origin's Transform component in its default state (Position(0,0,0), Rotation(0,0,0), Scale(1,1,1)).
💡 By default, the XR Origin's position is typically set at the origin of the real world (the position when the mobile application is launched), aligning the virtual and real worlds perfectly. If the XR Origin's position is not the default value, the position of virtual objects will deviate from the actual position in the real world.
Let's add these two components to our Scene.
- Let's start by adding
AR Session. In the Hierarchy Window, right-click on an empty area → Create → XR → AR Session.
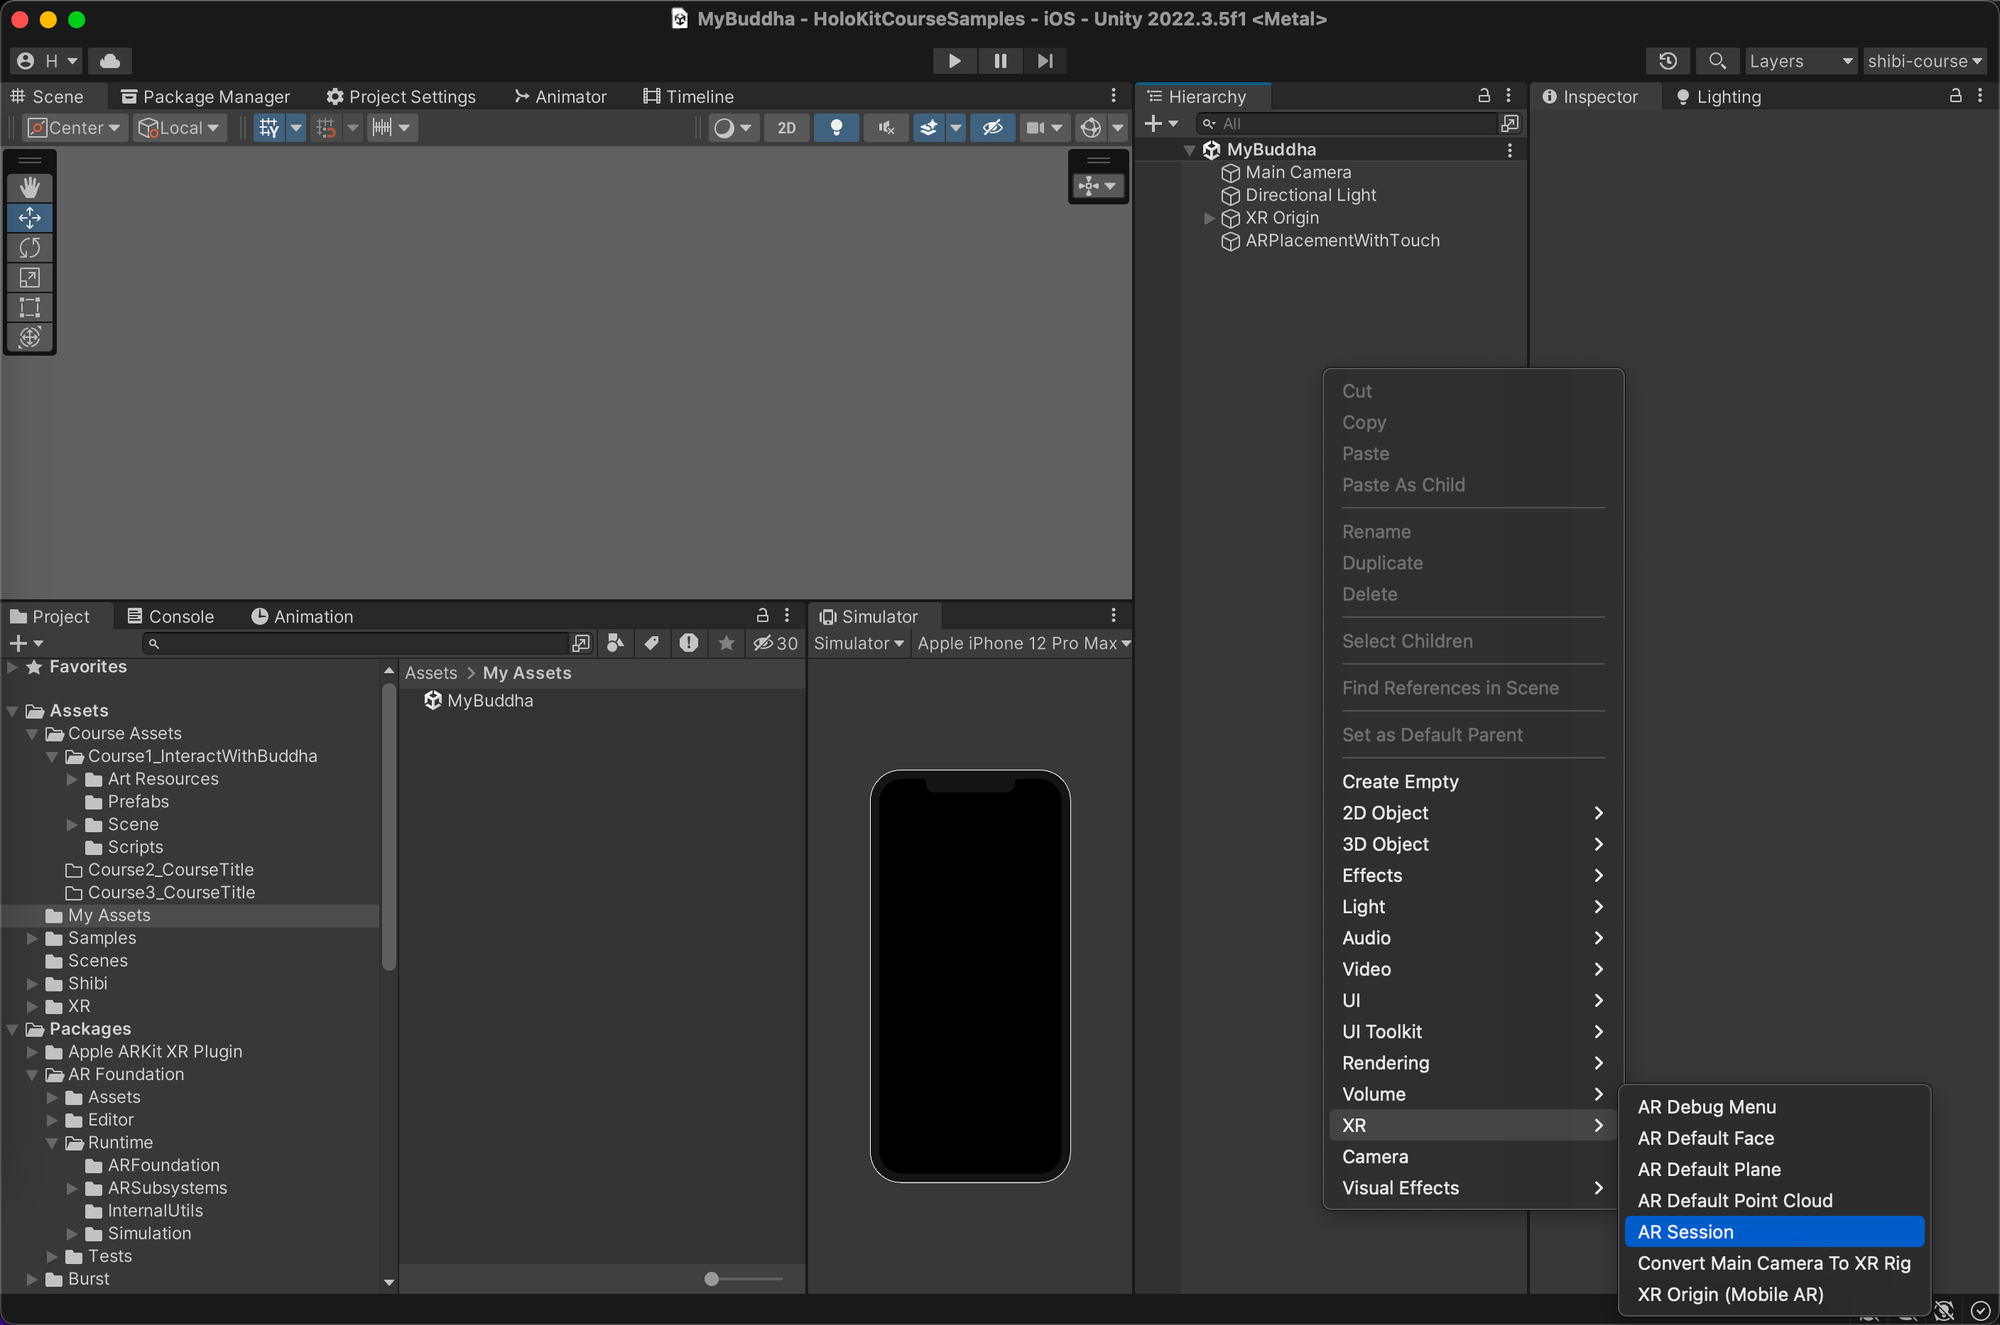
- Next, let's add
XR Origin. In the Hierarchy Window, double-click on an empty area → Create → XR → XR Origin.
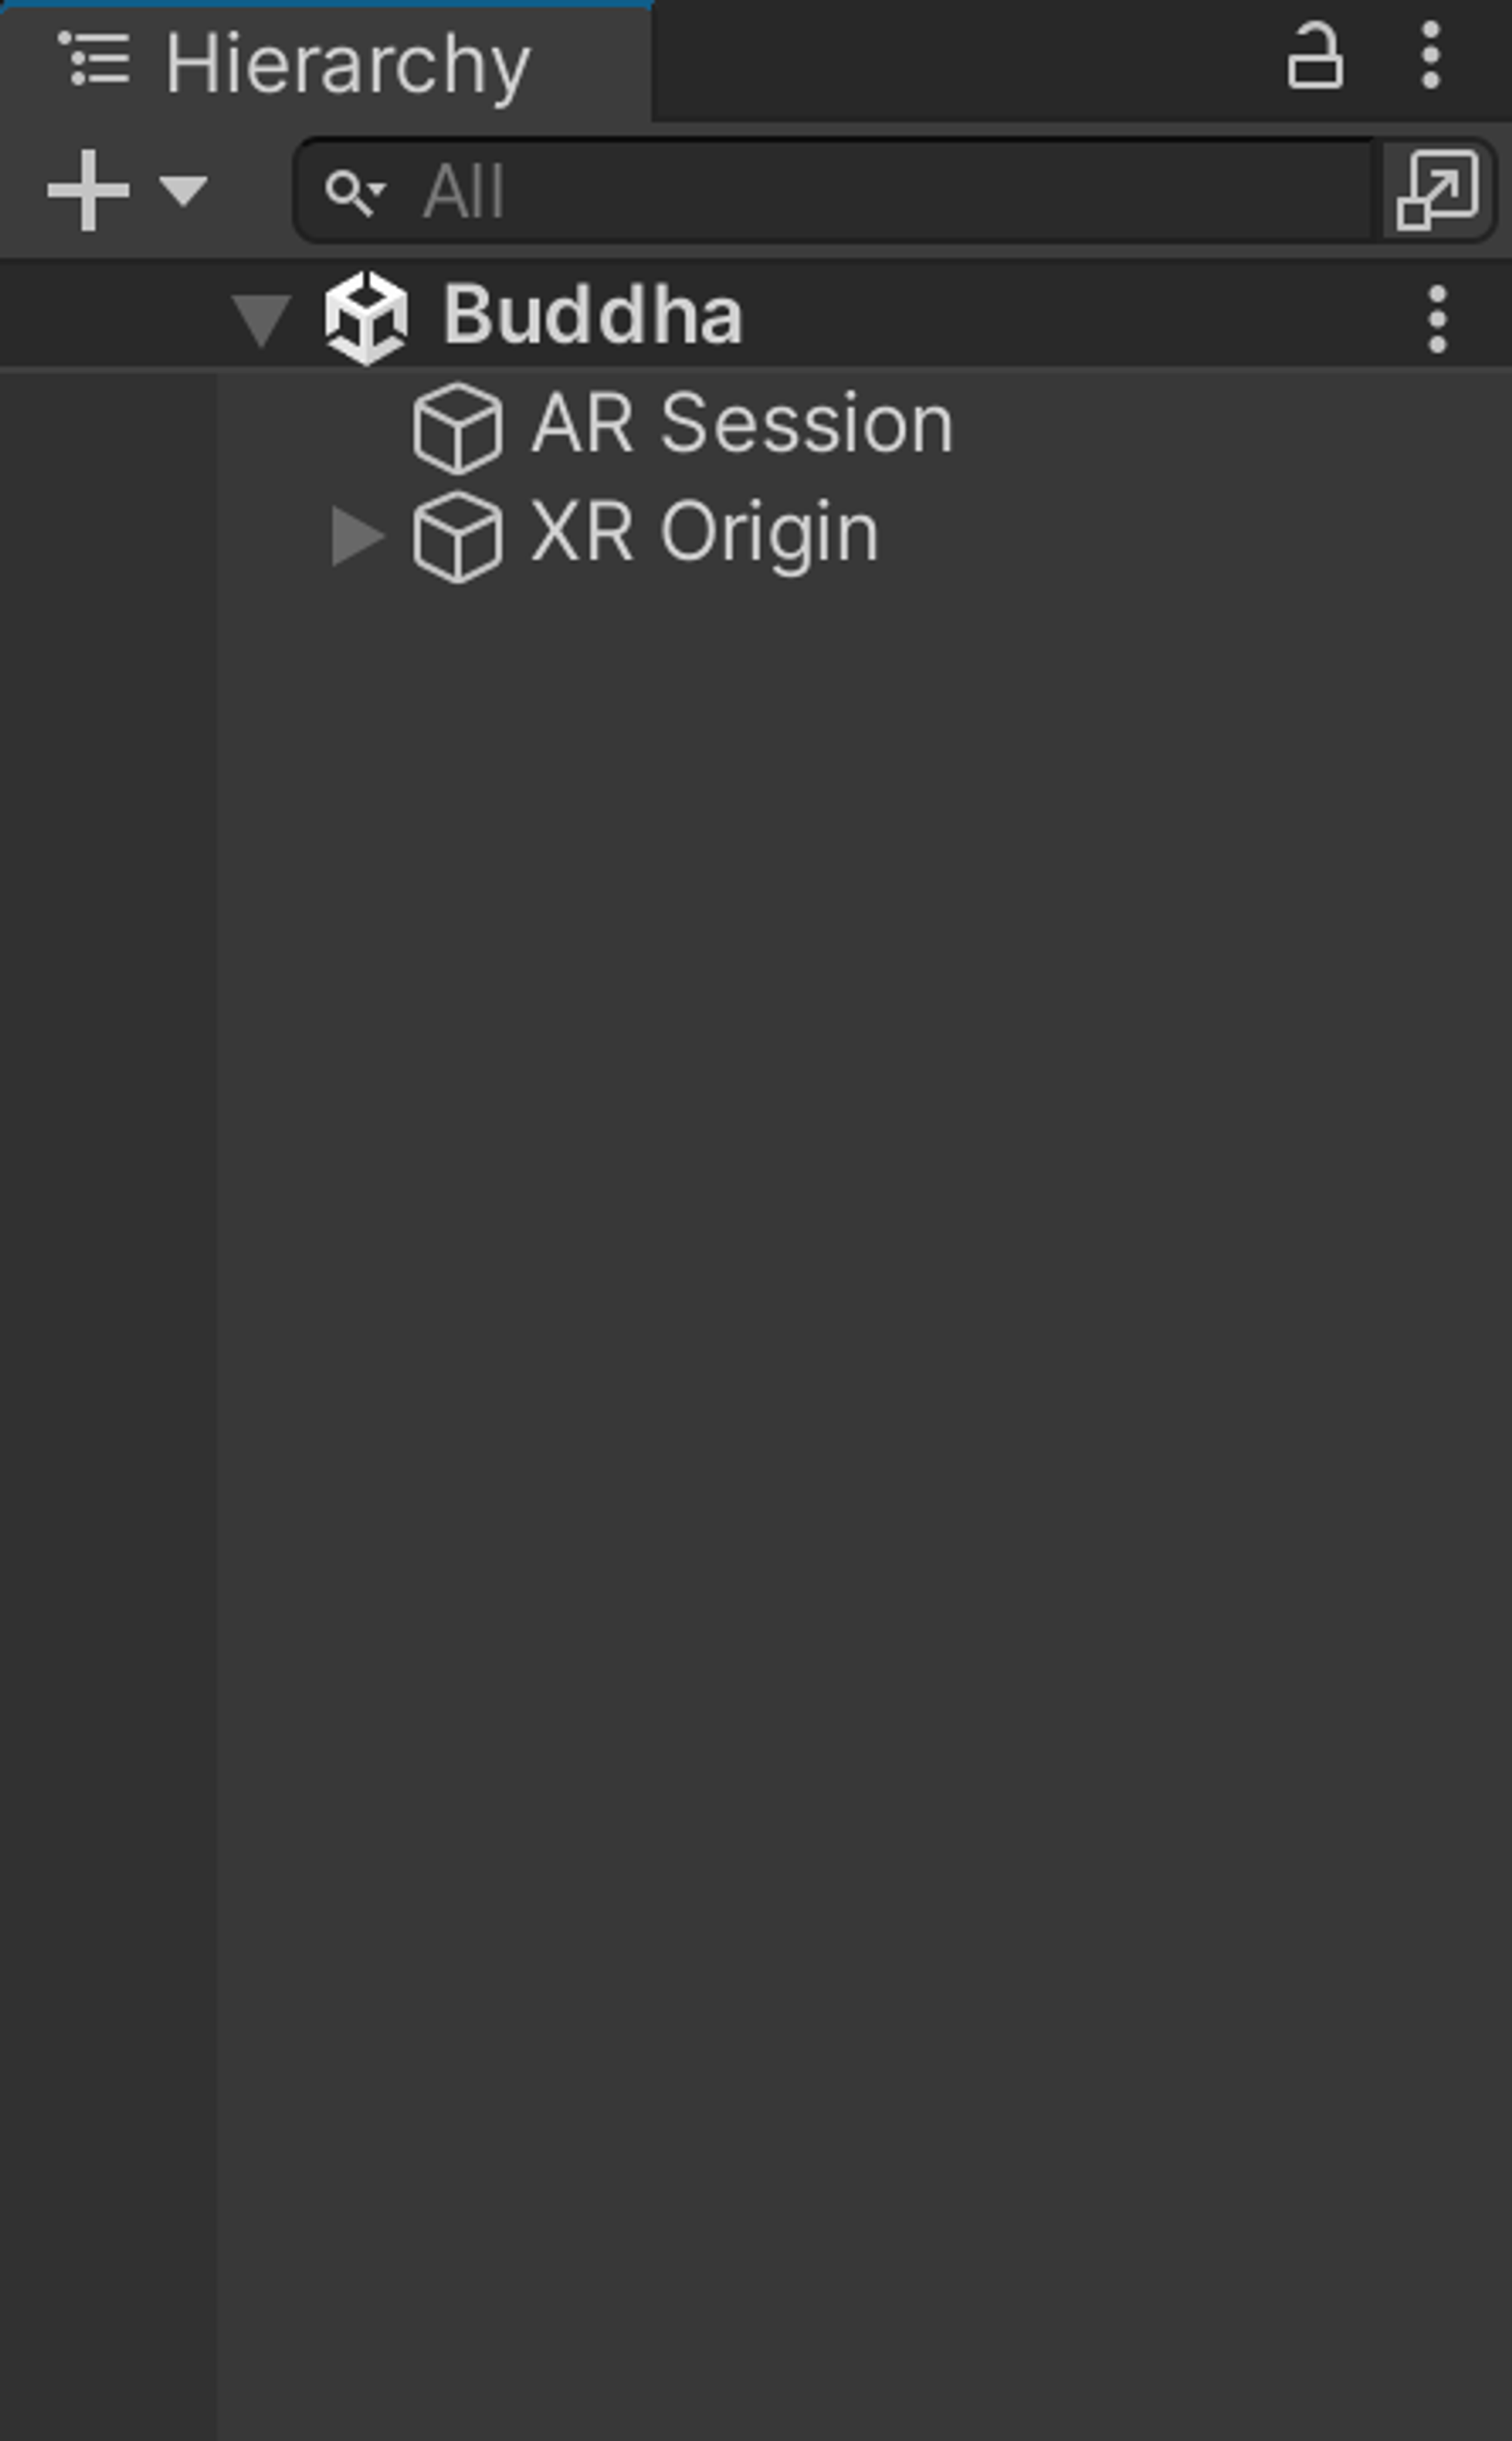
Your Hierarchy Window should look like this:
HoloKit Camera and Stereo Rendering
Unity's AR Foundation supports the development of Screen AR applications. However, when we intend to build Stereo AR
applications work with HoloKit, we need to utilize the HoloKitCameraManager.
- In the Hierarchy Window, find and select the “XR Origin”. Click the gray triangle to the left of XR Origin to open its sub-hierarchy.
- Continue by clicking the gray triangle to the left of “Camera Offset” to open its sub-hierarchy.
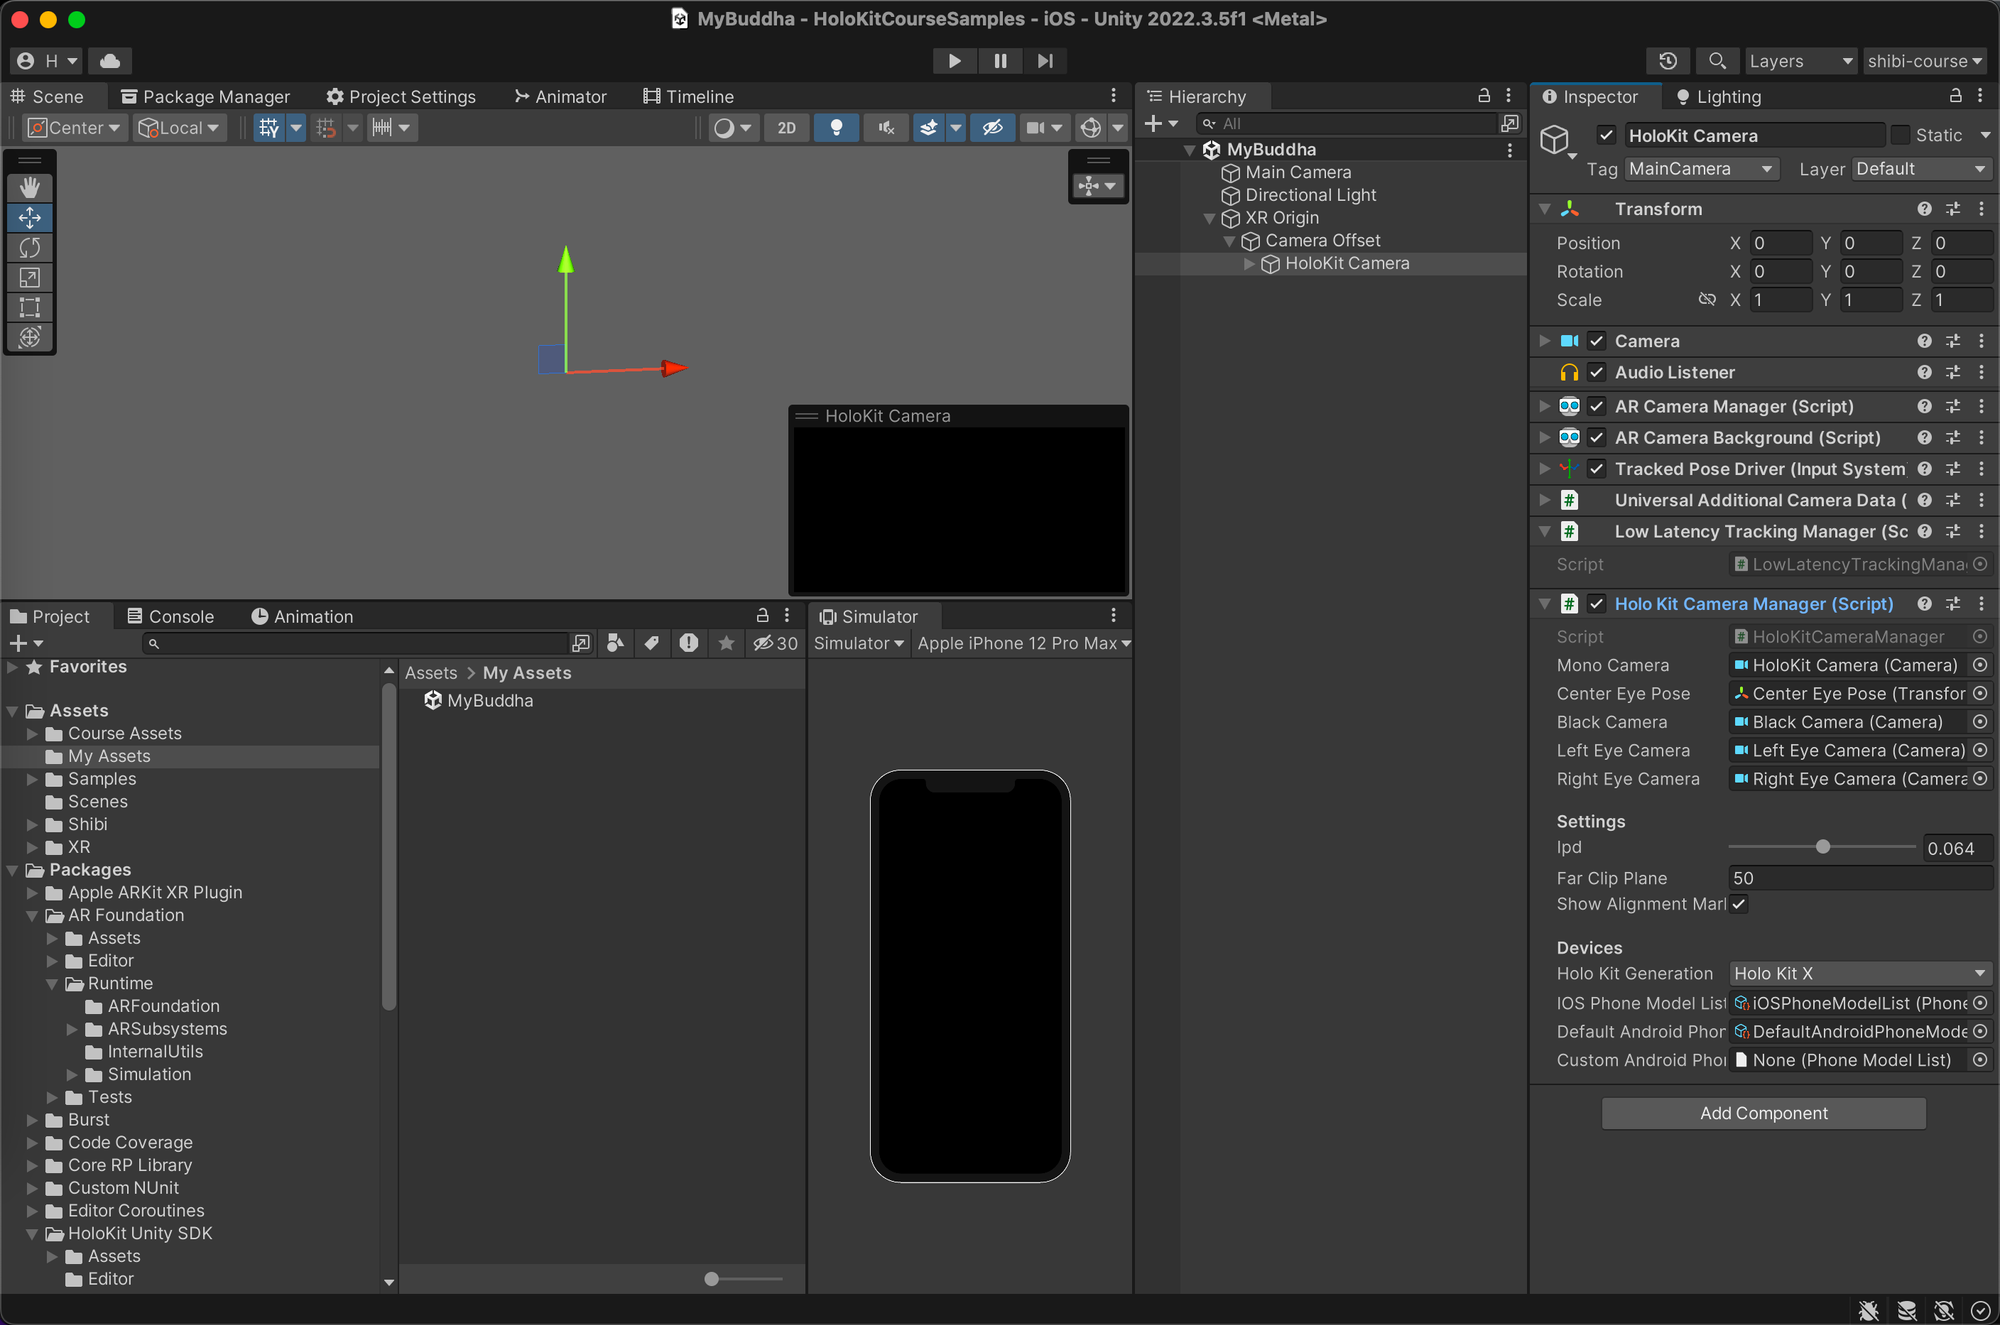
- Click on “Main Camera” in the sub-hierarchy of “Camera Offset”, and go Inspector Window on the right side of the Unity.
- Click the "Add Component" button at the bottom, type in "HoloKit Camera Manager" and click on "HoloKit Camera Manager" from the list to apply the component.
We could see the HoloKitCameraManager component in the Inspector Window:
Furthermore, under the “HoloKit Camera”, the HoloKitCameraManager help us added the following
sub-hierarchy automatically as the following image shows.
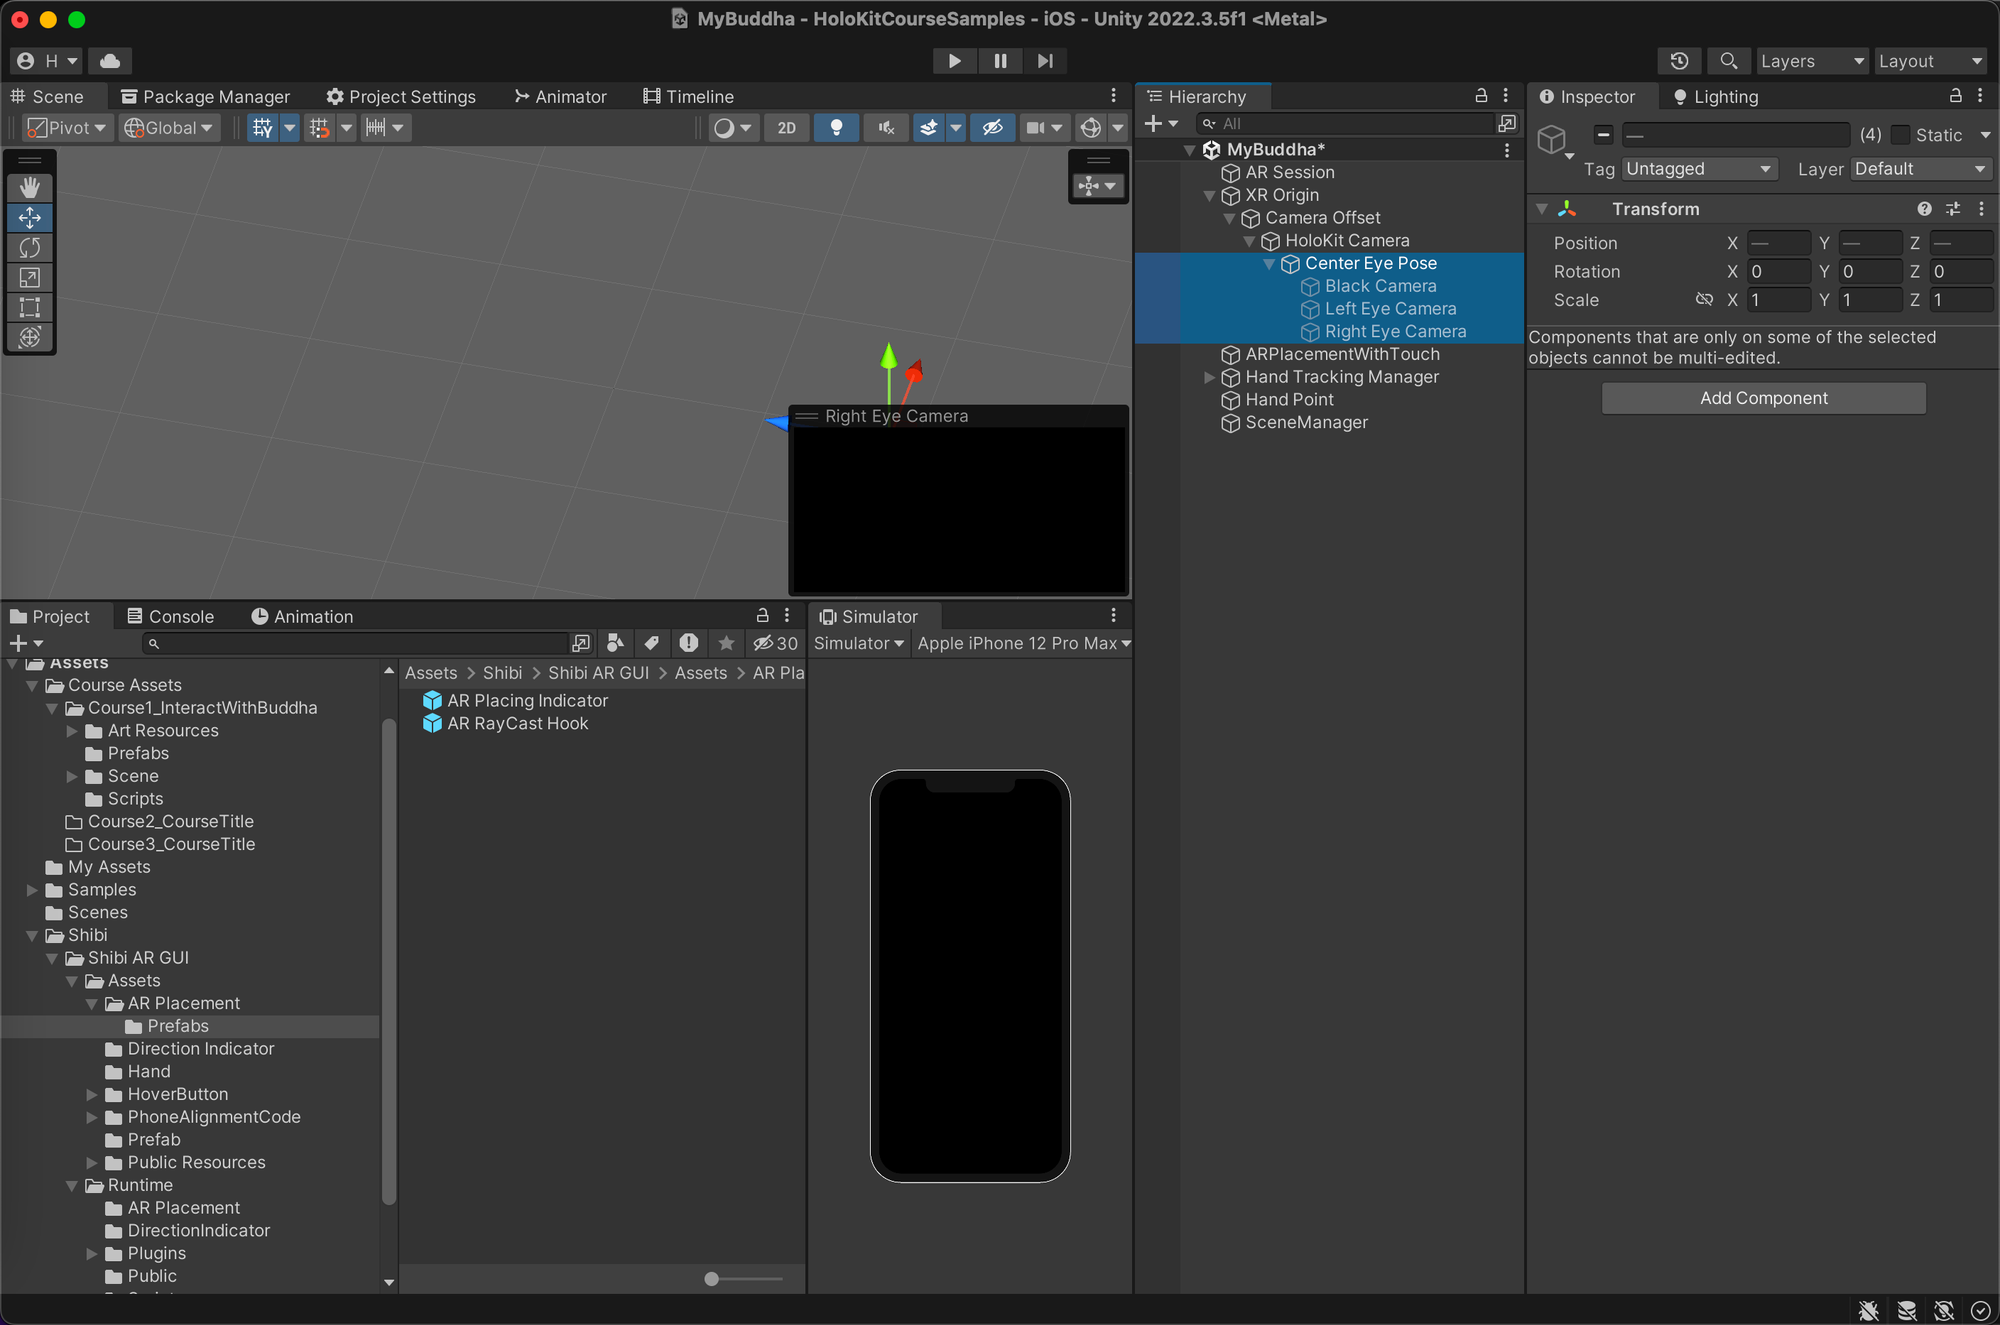
Among them, the “Center Eye Pose” represents the point between the two eyes, which can serve as a reference for the movement of our head. “Black Camera”, “Left Eye Camera”, and “Right Eye Camera” are used for background rendering, left eye content rendering, and right eye content rendering, respectively, in Stereo Rendering mode.
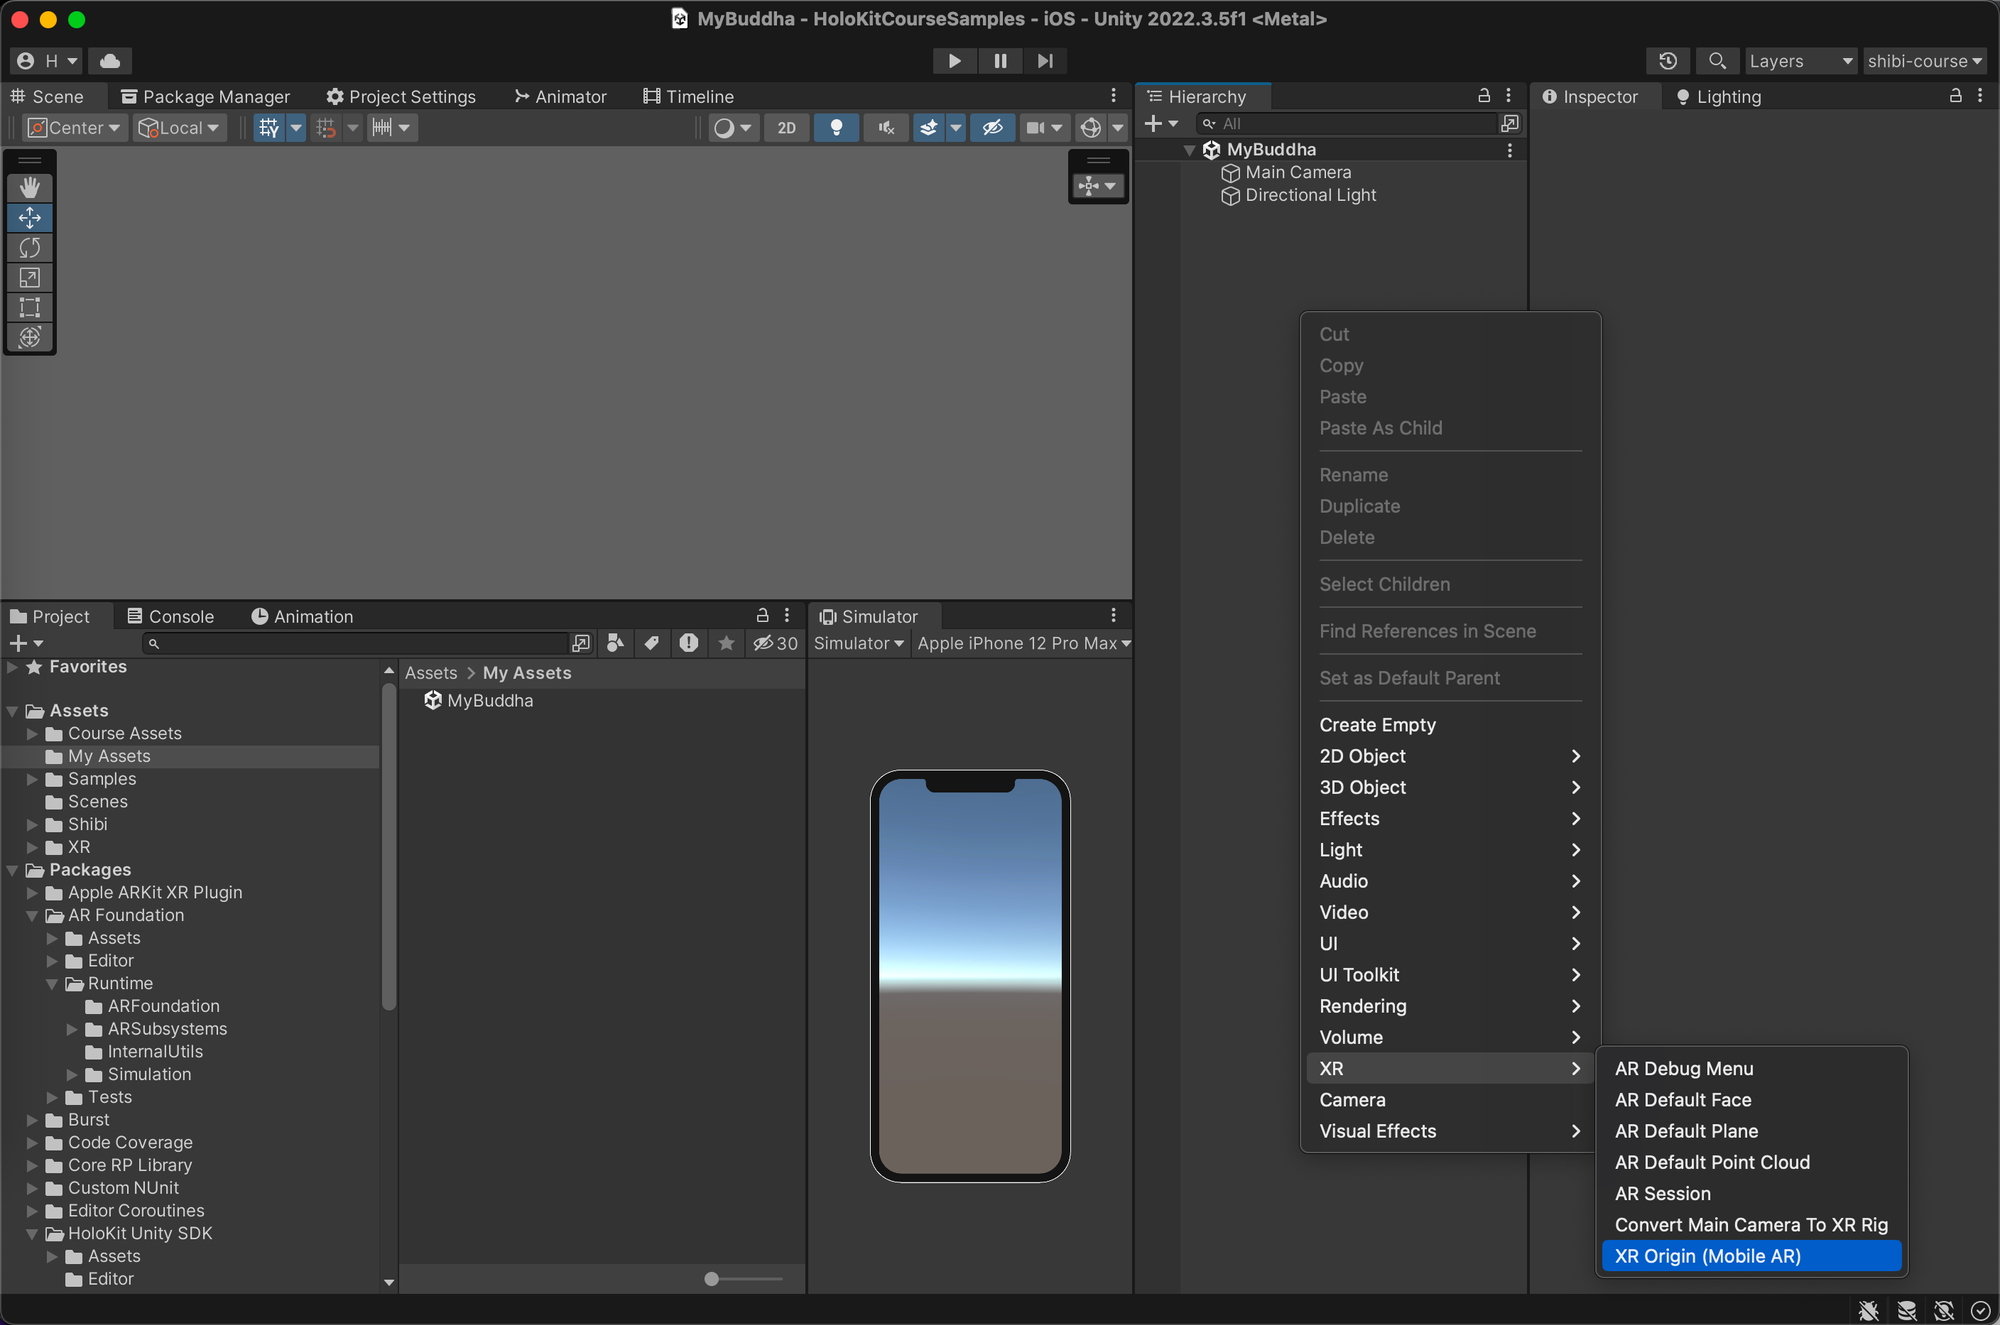
Quick Creation of XR Origin with HoloKit Camera
We've also included a menu option that lets you create an “XR Origin” along with a HoloKitCameraManager
simultaneously, streamlining the process.
- In the empty space within the Hierarchy Window, right-click and navigate to XR → HoloKit → XR Origin.
Adding a Button for Rendering Mode Switching
Unlike the typical AR scenes, our current scene features two rendering modes. One is the Screen-AR rendering mode, and the other is the Stereo-AR Rendering mode that supports HoloKit hardware. Therefore, we also require a simple button to facilitate the switching between these two modes.
- To access it, simply right-click within the Hierarchy Window, hover over "UI" and choose "Default UI Canvas" to create the button.
Section 3: Explore Prefab
Let's take a look at the virtual object we're about to place in the space — the Prefab Buddha.
The Prefab Buddha is presented in the form of a prefab. Why do we construct a prefab? It's because I want each of us to be able to drag and drop it instantly, making it incredibly convenient.
💡 In Unity, a Prefab is an essential resource type that allows for easy reuse. It serves as a template for storing and managing game objects and their components. Prefabs enable you to create and instantiate game objects with identical attributes and components in a scene, making it simple to reuse and manage these objects.
First, locate our prefab and drag it into our scene.
- Go to the Project Window, open: “Course Assets” → “Course1” → “Prefabs” → “Buddha”
- Click and drag the “Buddha“ into empty area in the Hierarchy Window to place it in the scene for viewing.
The Prefab Buddha consists of three main parts: Visual Part,
-
It has a VFX effect that creates a particle-style representation of the Buddha figure.
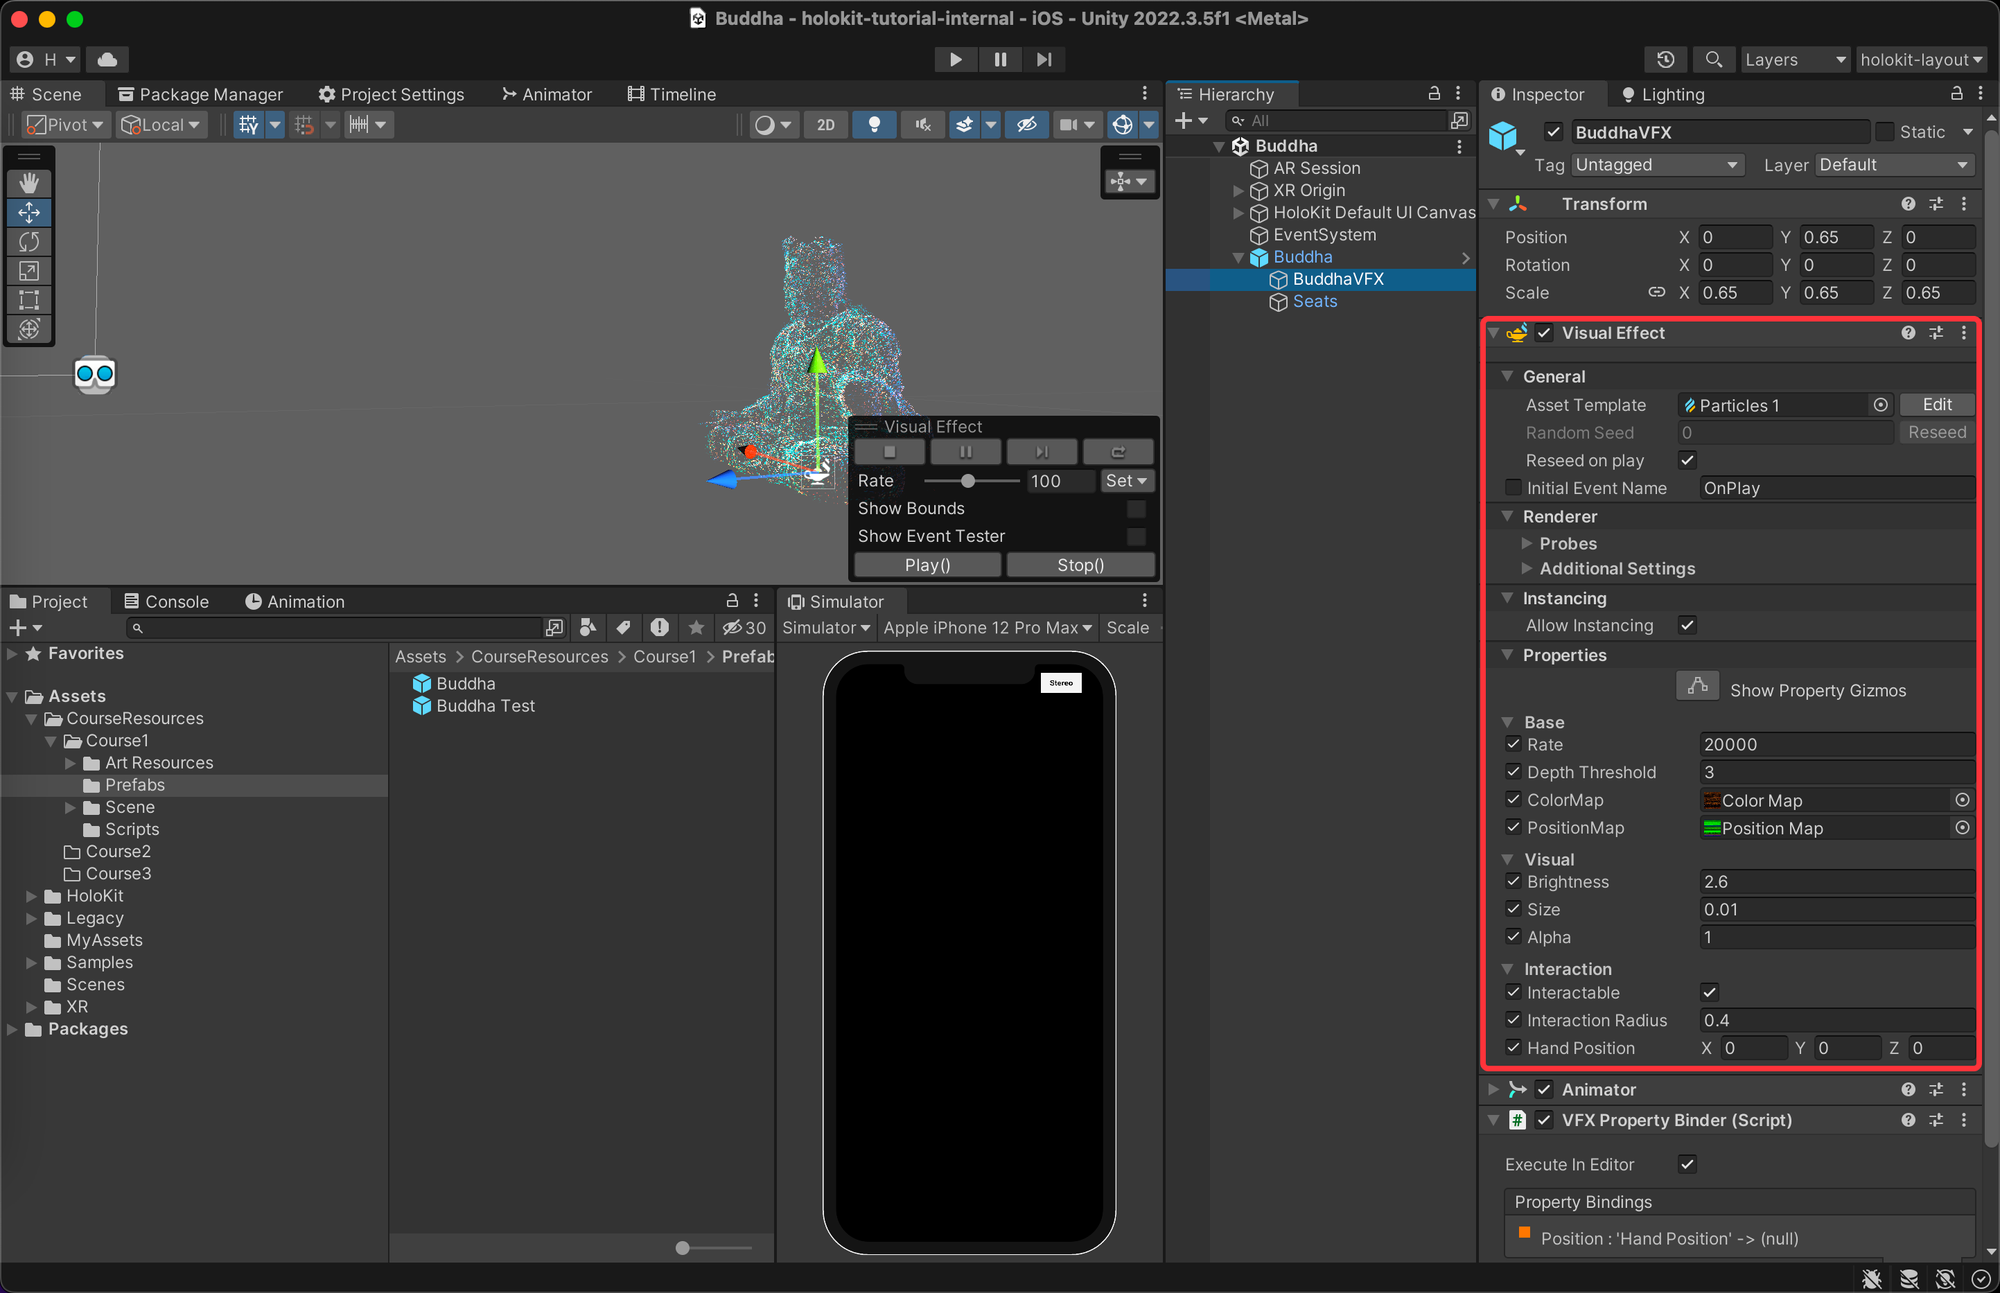
-
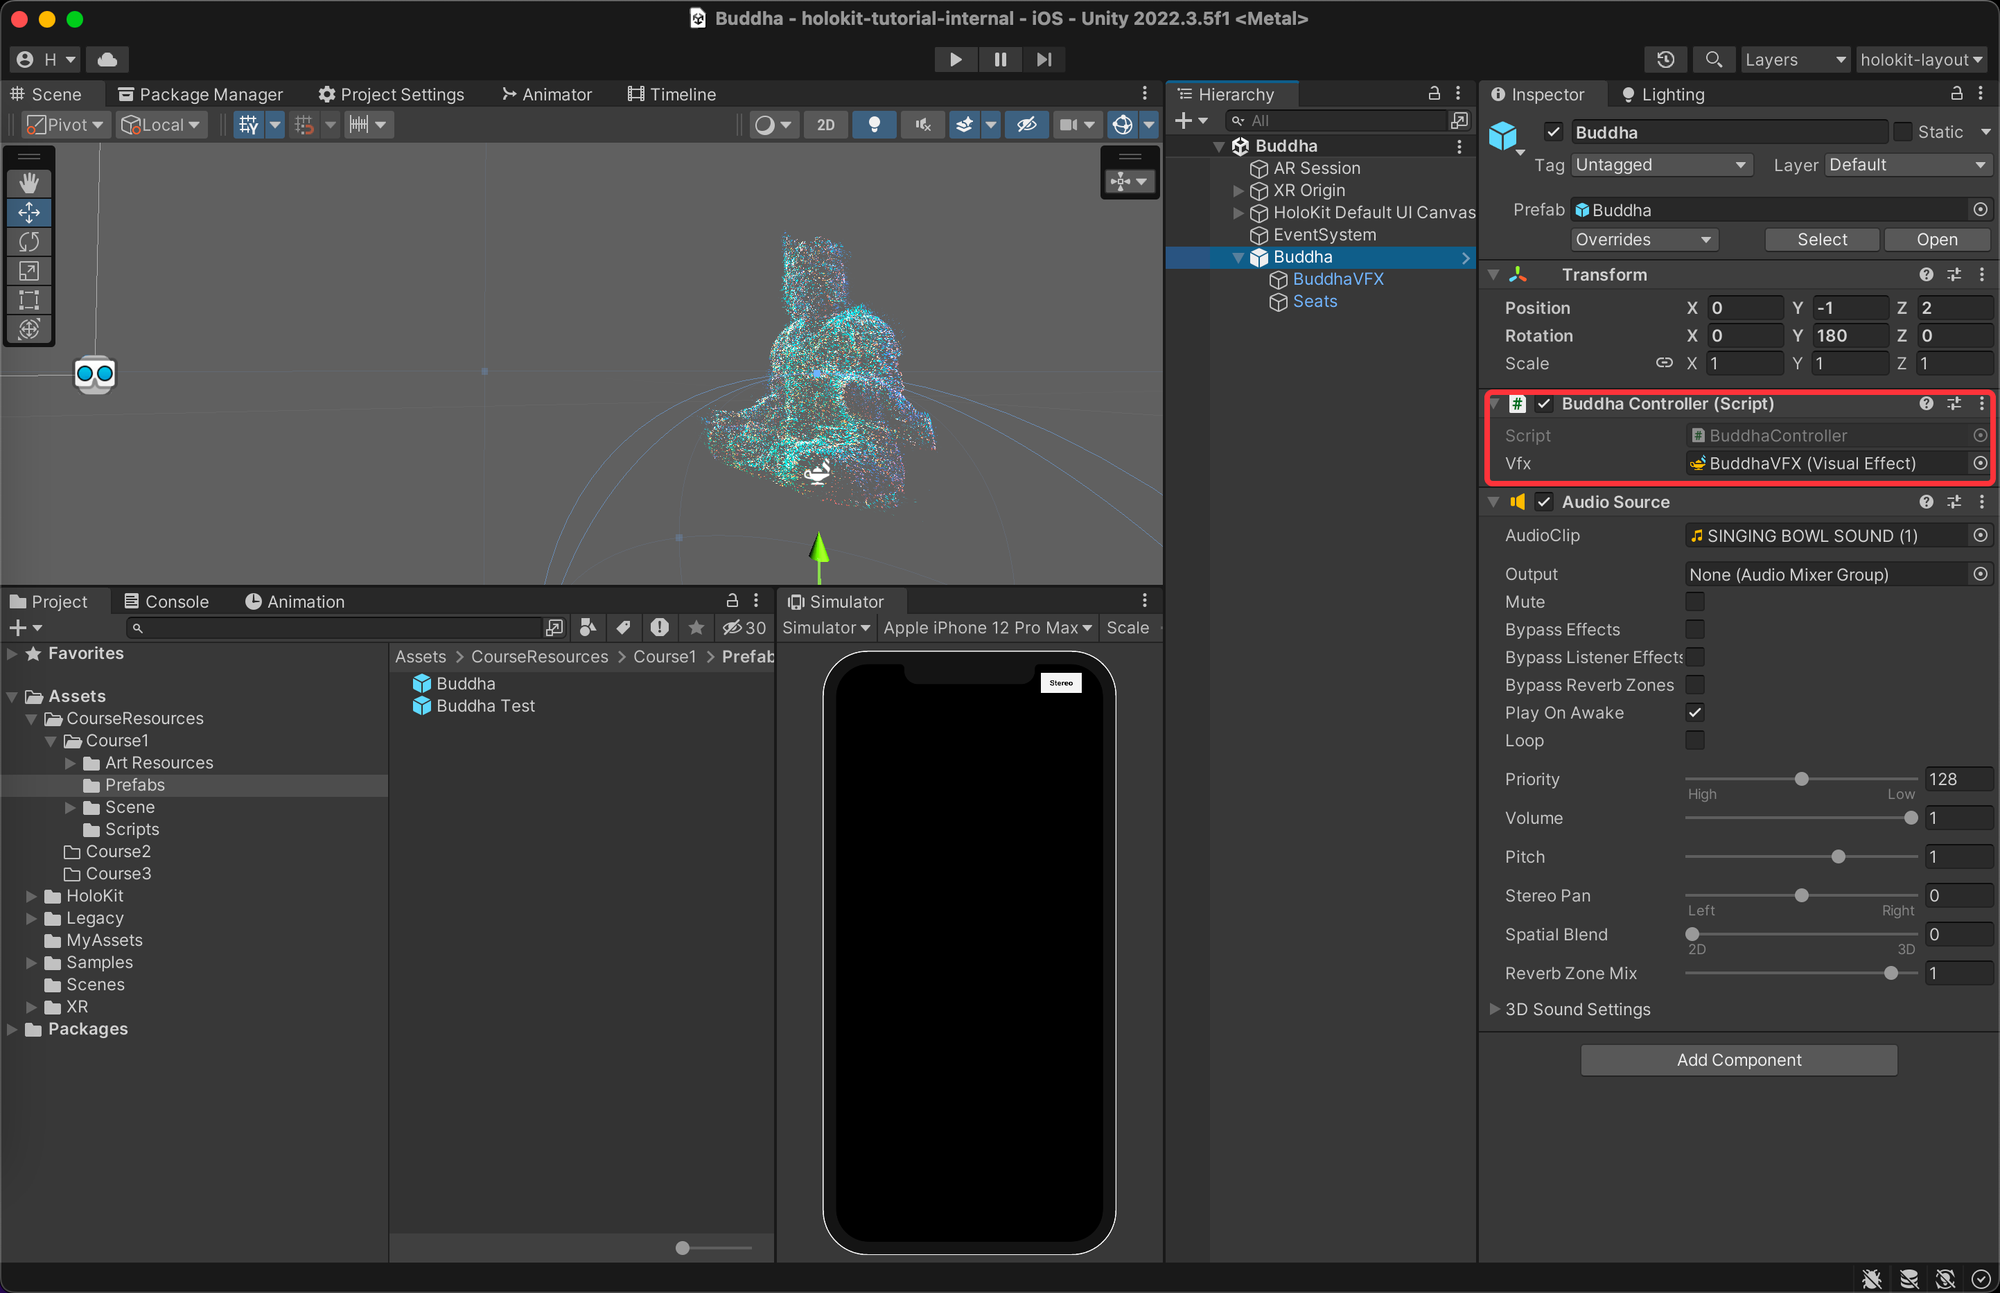
It has a Buddha Controller component that actively searches for the position of hand after this prefab is created and binds the position to the VFX, in this way the Visual Part can interact with our hand
-
It has an
AudioSourcecomponent to play sound. When the Buddha is created, play a trigger sound as feedback and enhance the immersive experience.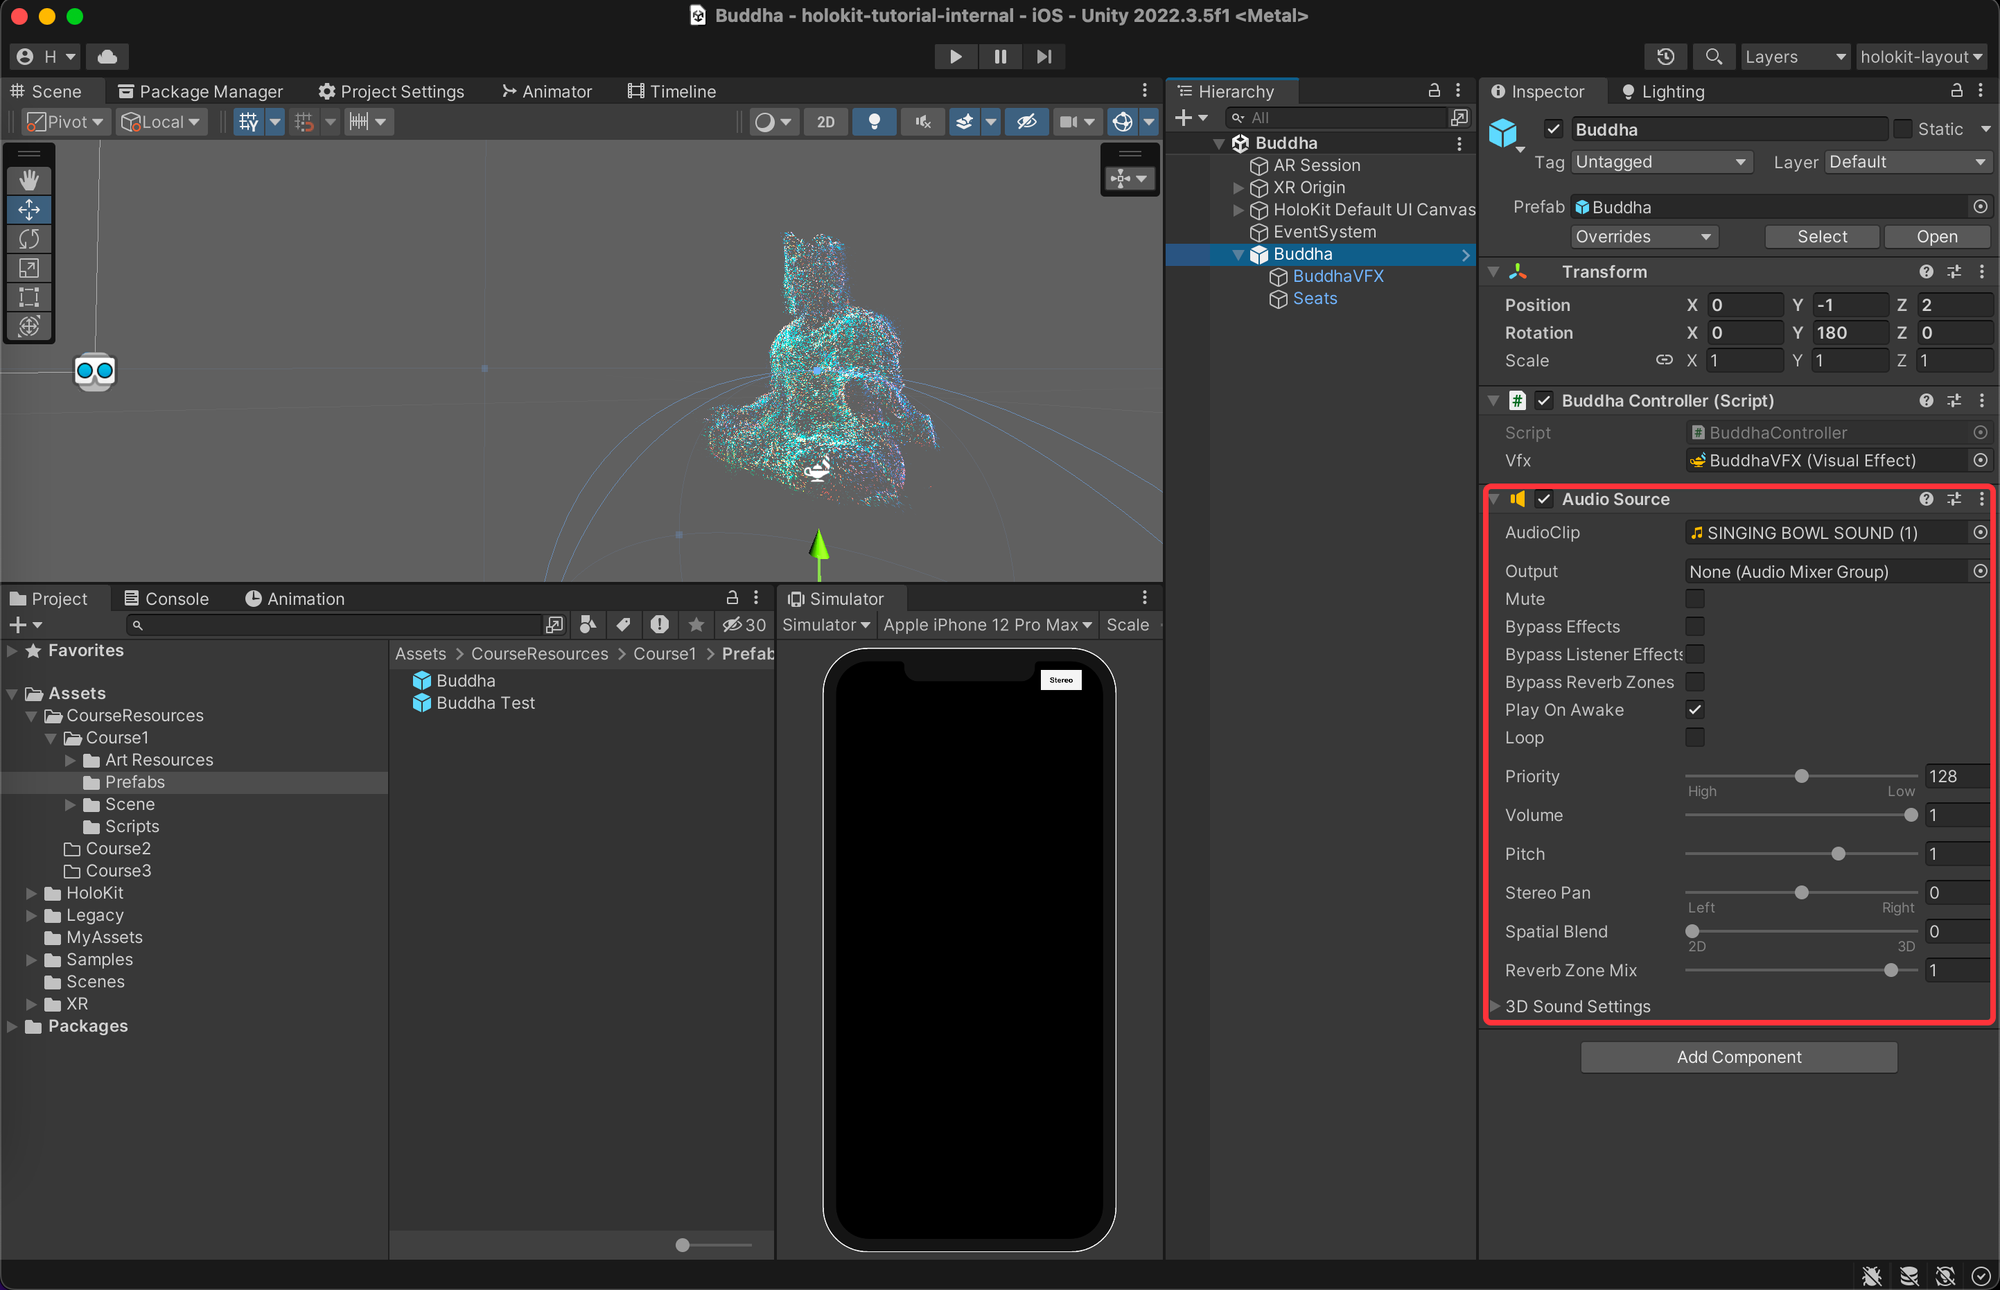
The Prefab Buddha is intended to be created at runtime, let's remove the Buddha from the scene for now.
- Right-click on “Buddha” → “Delete”, to remove it from the scene.
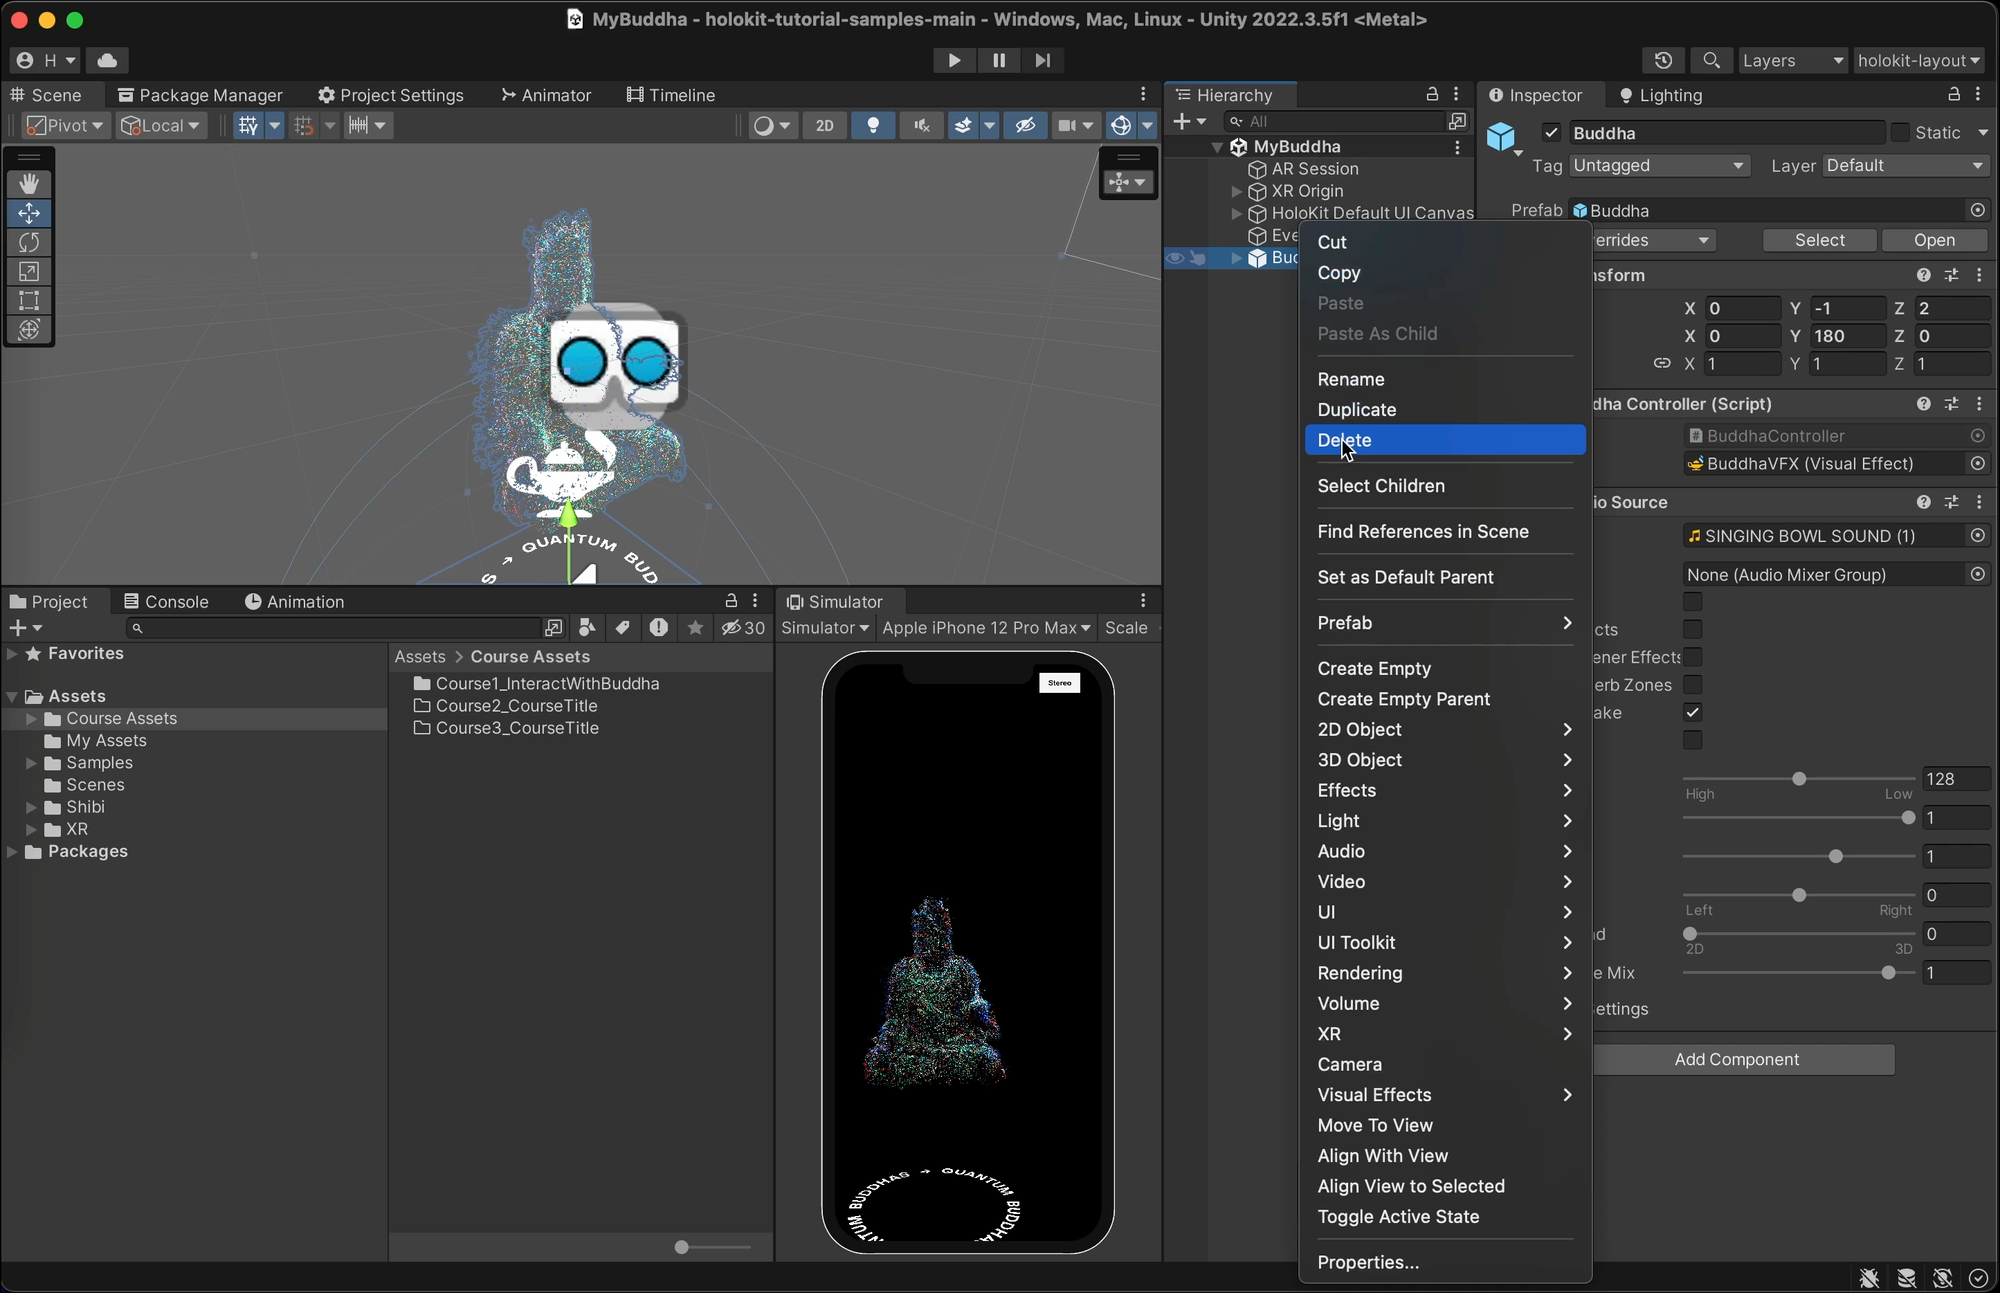
Delete Buddha From Scene
Section 4: Placing Objects Within AR Environments
Add ARRaycastManager
Since we aim to position virtual objects within the real world, it's crucial that we have the ability to specify their placement location. Ideally, this location should be contextually relevant to the real environment, rather than consistently floating in mid-air or getting stuck within surfaces like the ground or walls.
To achieve this, ARRaycastManager is our go-to choice. it allows you to cast rays in environment to
detect planes, objects, feature points, or other virtual content within the AR session.
Let’s add ARRaycastManager to our scene.
-
Go to the Hierarchy Window, click on “XR Origin” to select it, click “Add Component”, type in “AR Raycast Manager”, click on
ARRaycastManagerto apply it.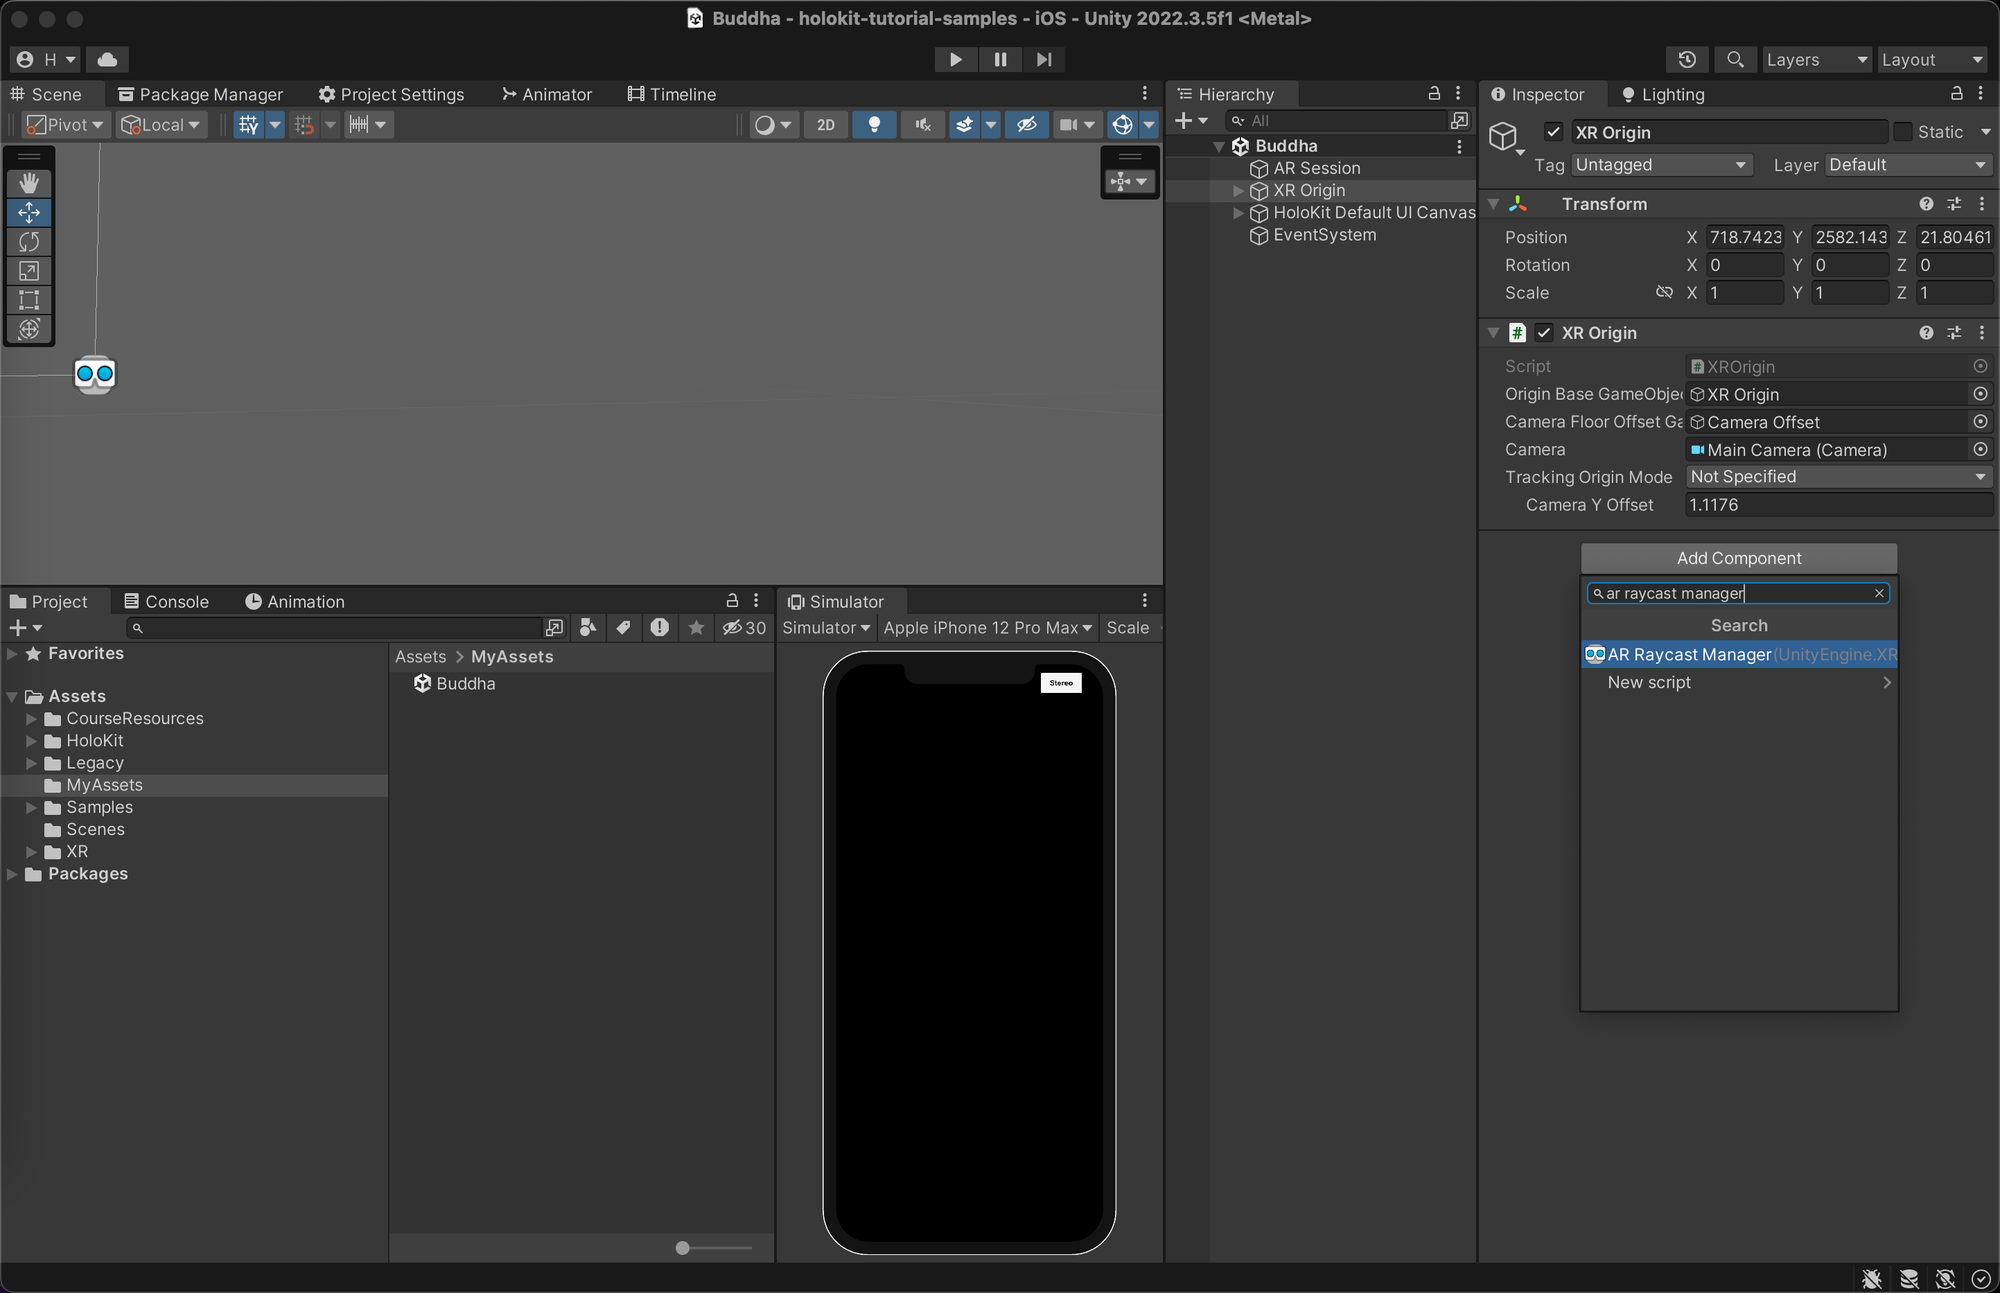
Moreover, we require a component to unlock the potential of the ARRaycastManager.
The ARPlacementWithTouch component leverages the functionalities provided by the
ARRaycastManager, projecting an invisible ray from the screen's center along the camera's direction.
When the user taps the screen and this ray intersects with a plane (like the ground, wall, or ceiling), it instantly
creates a predefined virtual object at the intersection point.
Add ARPlacementWithTouch to our scene.
- First, in the Hierarchy Window, right-click → “Create Empty” to create a GameObject.
- Right-click on it → “Rename”, to rename it to "ARPlacementManager“.
- In the Inspector Window, click “Add Component”, type "ARPlacementWithTouch", click on
ARPlacementWithTouchto apply it.
In order to inform ARPlacementWithTouch about the specific object we want to create, we need to find the
prefab in the Project Window and drag it into the "SpawnedPrefab" field of ARPlacementWithTouch.
- Go to the Project Window and find prefab "Buddha".
- Click and drag it into the "SpawnedPrefab" field of
ARPlacementWithTouch.
Now, whenever you tap the screen on your phone, the virtual object will be created at the specified location. Enjoy the magic of placing virtual objects in the real world!
Add Placement Indicator
As previously discussed, the component ARPlacementWithTouch enables you to cast a ray into the
environment, detecting collisions in real time. By visualizing the collision point, we can accurately determine the
exact location to create our virtual object. Consequently, an indicator is necessary to visually represent the
collision point.
To achieve this, we just need add an indicator prefab to the blank field “Placement Indicator” of
ARPlacementWithTouch.
- In Project Window, go Shibi→Shibi AR GUI→Assets→AR Placement→Prefabs, find “Indicator Prefab”, hold and drag it
to “Indicator Prefab” field of
AR Placement With Touch.
Section 5: Introducing Hand-Tracking Capability
To enable hand interaction with the Buddha, our program needs two capabilities:
- The program should provide the ability to track the position of our hands. We got
HandTrackingcomponent to help us. - The virtual object should be able to interact with the a position(in this tutorial, it’s position of our hands).
Let's start with adding HandTracking component.
Add Hand-Tracking Component
- First, create an empty GameObject (we already have done this before, try doing it again by yourself), and rename it to "Hand Tracking”.
- In the Inspector panel, click "Add Component", and type "Hand Tracking Manager” to search.
- Click on
HandTrackingManagerto add the component to the "Hand Tracking" GameObject.
💡 It's worth noting the configurations within HandTrackingManager: we've opted for "Max Hand Count:
One" and enabled "Hand Joint Visibility." The former indicates that we are currently tracking joints of one
hand(not both), while the latter ensures that the tracked joints are visually displayed for reference.
However, this is not enough to enable Hand-Tracking capability since it requires access to the depth map. We need to enable the Lidar camera of our mobile to obtain the depth map.
To enable the Lidar camera, use a device that has a Lidar camera, and manually add AROcclusionManager to
the main camera.
💡 The AROcclusionManager is a component for AR applications. It allows you to implement occlusion
effects in the AR environment, meaning virtual objects can be occluded by real-world objects, enhancing the
interaction and realism between the virtual and real environments.
-
Find Object "HoloKit Camera" under Object "XR Origin", click "Add Component" and type: "AR Occlusion Manager", click on
AROcclusionManagerto apply it.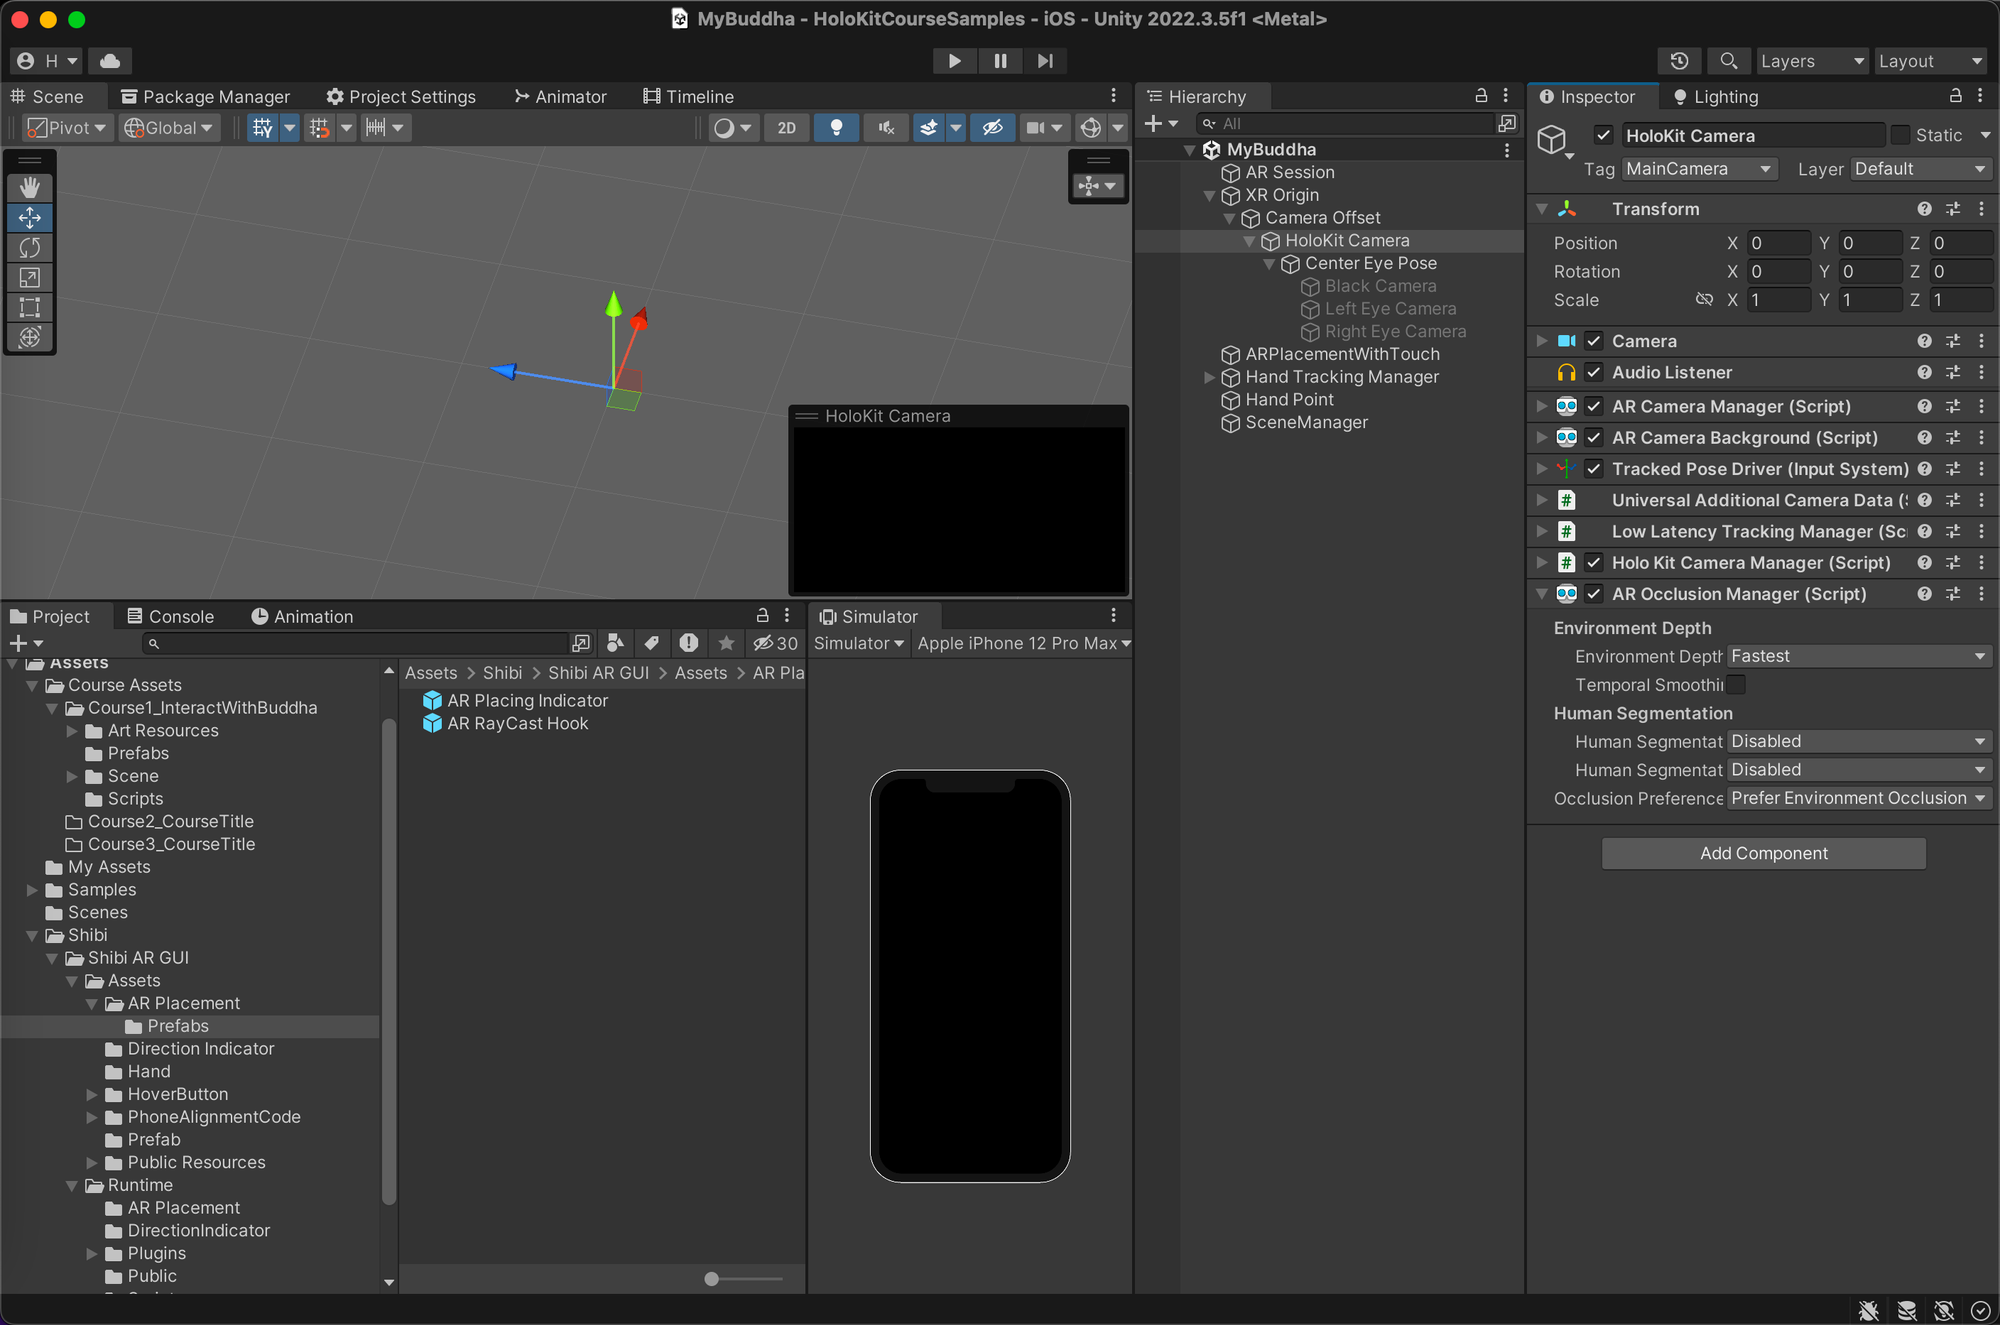
Add AR Occlusion Manager
With the hand tracking feature now in place, if we proceed to build our app for a mobile device, we should observe the following outcomes:
Getting a Hand's Representation
As we observe, hand tracking feature aids us in monitoring all the joints of our palm. However, in our scenario, we don't require the entirety of information about each joint. Our objective is to determine a single position that roughly represents the hand's position.
First, let’s choose a Joint to represents the hand's position.
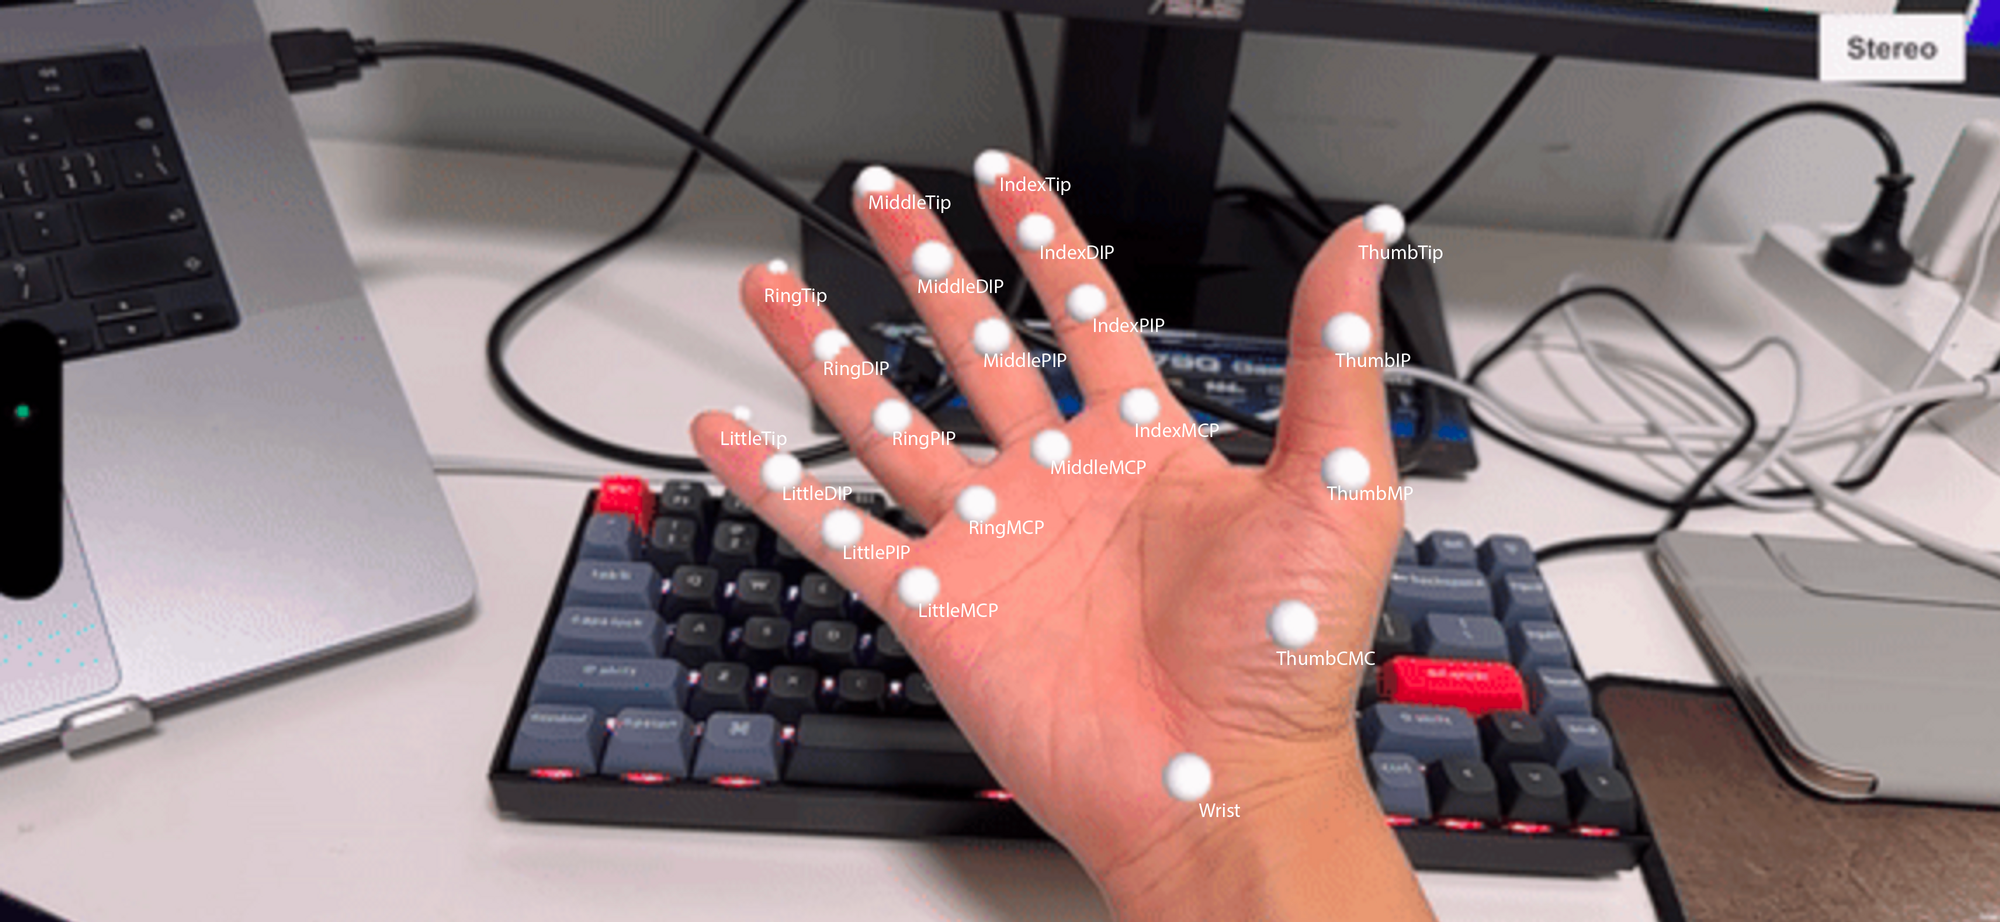
As the image shows, the joint MiddleMCP seems at the most center part of an opened palm. I’ll take this joint.
- Open the sub-hierarchy of the object
Hand Tracking Manager, then open the sub-hierarchy of Object Hand 0. You’ll find object MiddleMCP and the other joint objects here.
Remember the location of MiddleMCP, as we'll utilize it later on.
Section 6: Implementing Scene Manager
In Unity, a scene manager script is commonly used to centrally handle operations such as loading, switching, and unloading game scenes.
By customizing a scene manager script, you can gain more flexibility in controlling scene transitions, data communication between scenes, and handling some global logic, etc…
Today, we're focusing on the feature handling some global logic. With the scene manager we provided,
BuddhaSceneManager , we'll take object "MiddleMCP" as a public parameter. This approach enables the
Prefab Buddha, which will be generated at runtime, to easily locate and utilize its position.
- First , in the Hierarchy Window, right-click, create Empty Object, and rename it to "Scene Manager"
- Next , click “Add Component”, type in "Buddha Scene Manager", click on
BuddhaSceneManagerto apply it.
- To take object "MiddleMCP" as a public parameter. Drag the object “MiddleMCP” onto the blank field of
BuddhaSceneManager.
Section 7: Integrating Background Music
In the realm of AR, visual elements often steal the spotlight, but there's an equally vital player that significantly shapes the immersive landscape: sound.
We also want a background music to enhance the whole experience. Let's add an Audio Source component to
the object Scene Manager.
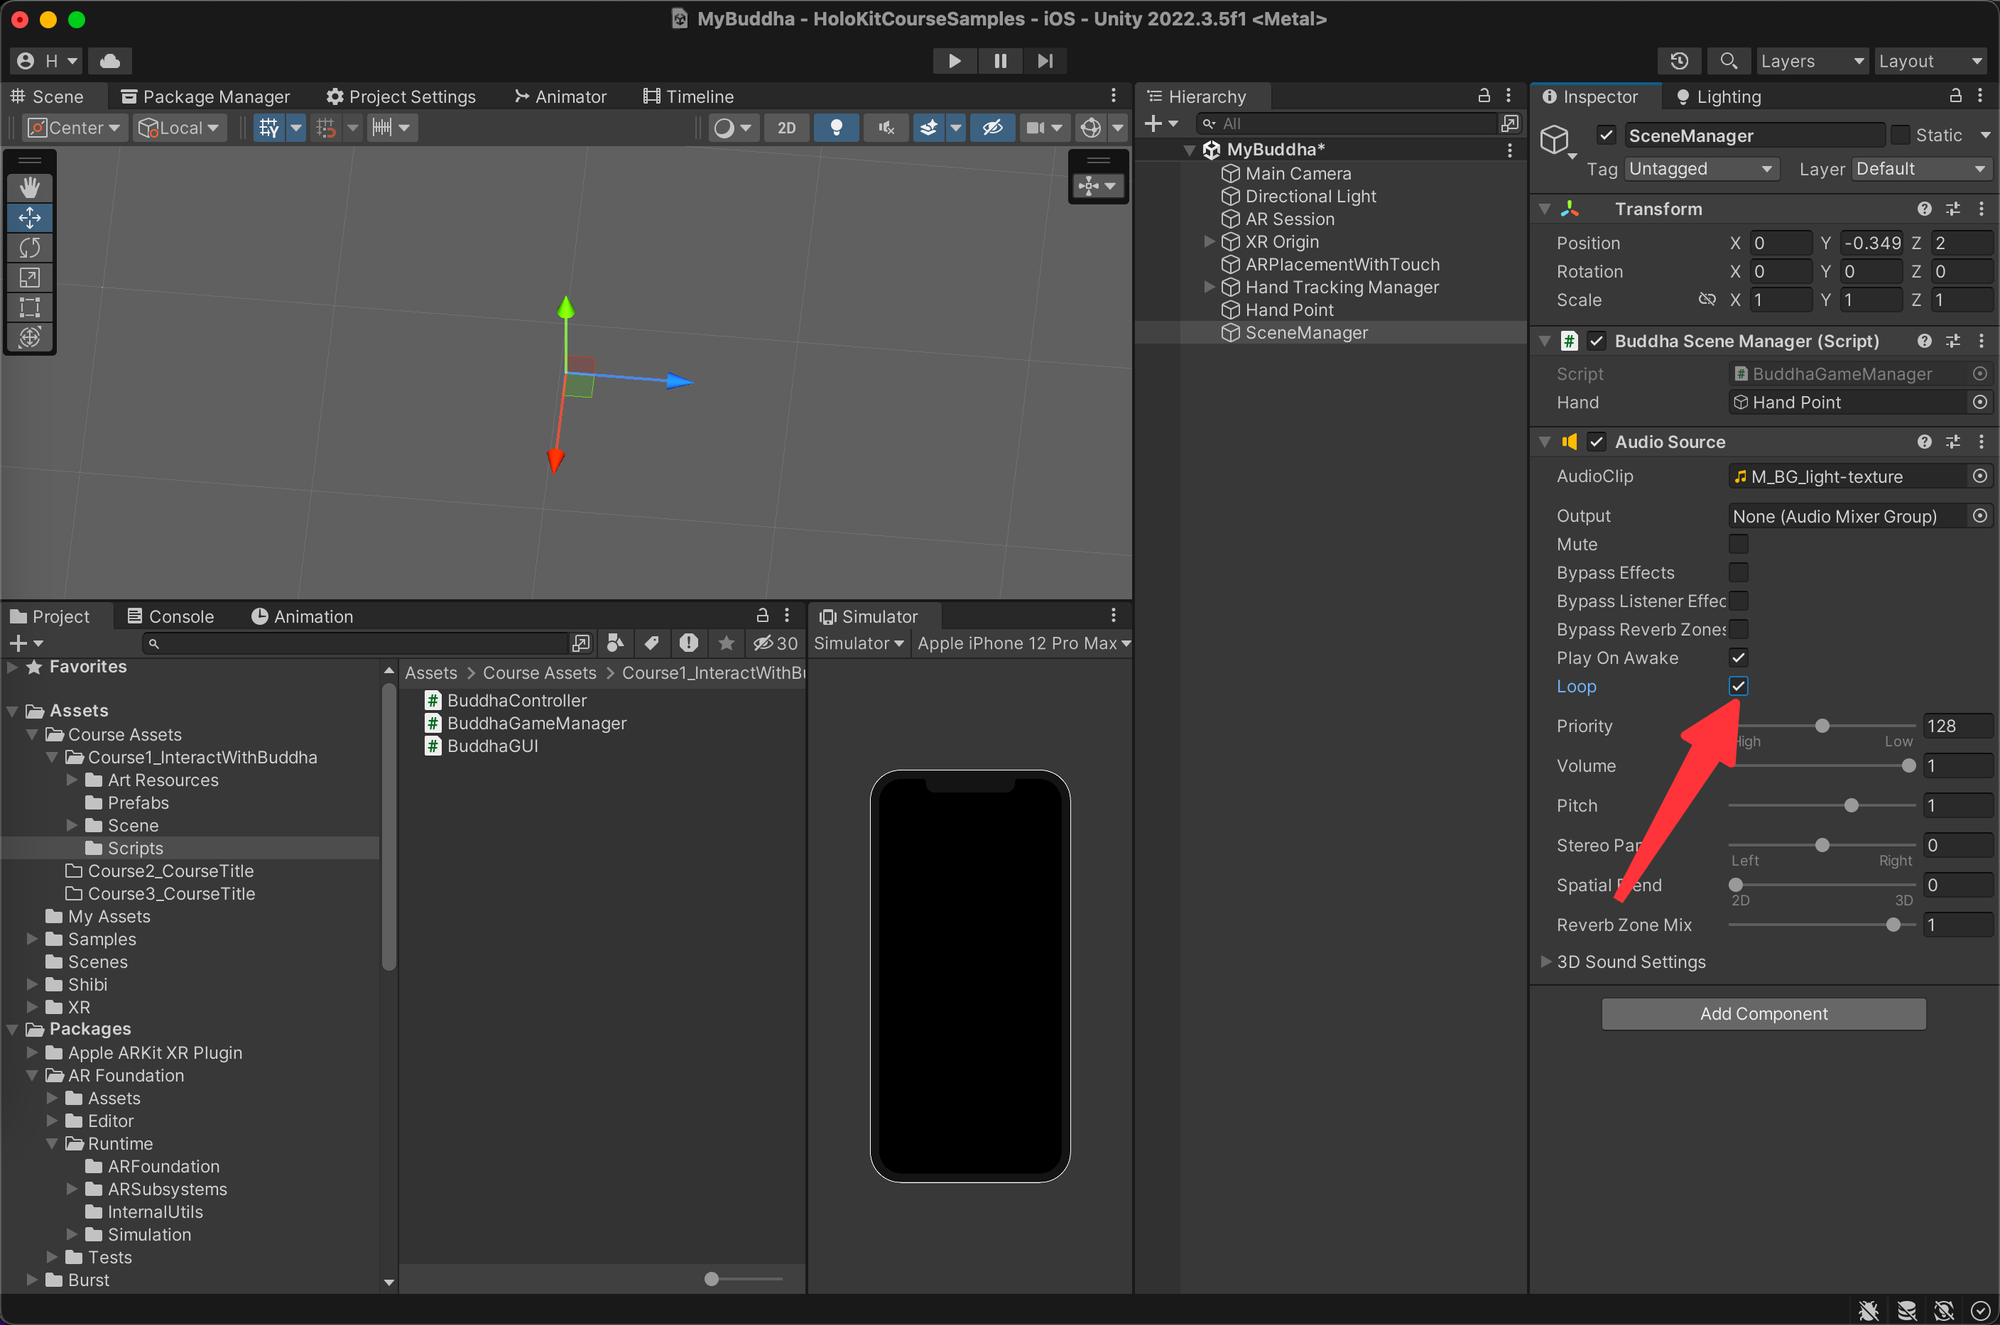
- Click on object Scene Manager to select it, click “Add Component”, type in “Audio Source”, click
AudioSourceto apply it.
- Click the circle to the right of Audio Clip to select an audio file to play.
- In the search bar above, type "LightTexture," and click audio file "M_LightTexture" to preview its sound.
- Double-click on this audio file to confirm your selection.
We should also ensure to enable the "Loop" option to enable the song to play continuously. This is important because if the user's experience time surpasses the duration of the music, we wouldn't want the scene to become silent, correct?
All set! Welcome to a world filled with sound!
Section 8: Testing in Play Mode
Before build to your mobile, remember testing your app in the Play Mode, to ensure interactions and functionalities work as expected and check for any console errors.
The reasons for doing this are as follows:
- Testing in editor mode is quick. With a single click, we can enter Play Mode, check if there are any errors in the Console Window, and verify if certain processes are meeting our expectations. If issues arise, it's easy to exit Play mode, make adjustments, and enter Play mode again. This allows for rapid iteration of our scene.
- Building the mobile app can be slow. Building onto a mobile device and waiting for the app to open on the device can take several minutes (even longer for the first build or for large projects) before seeing the results.
- Multiple testing cycles speed up development. When developing an MR(AR) application, it's recommended to conduct multiple testing cycles, involving both editor testing and building to the mobile device.
However, since the project of this course is small at size, we can do our first test towards the end. If your project is larger, be sure to conduct multiple tests during your development. Nobody wants to complete the entire application enthusiastically, only to enter Play mode and discover a multitude of error messages, right?
Let's enter Play Mode to check for errors and observe the effects in the Simulator Window:
- Click “Play” icon to enter Play Mode. Then, click on the screen in the Simulator Window to create the Prefab Buddha.
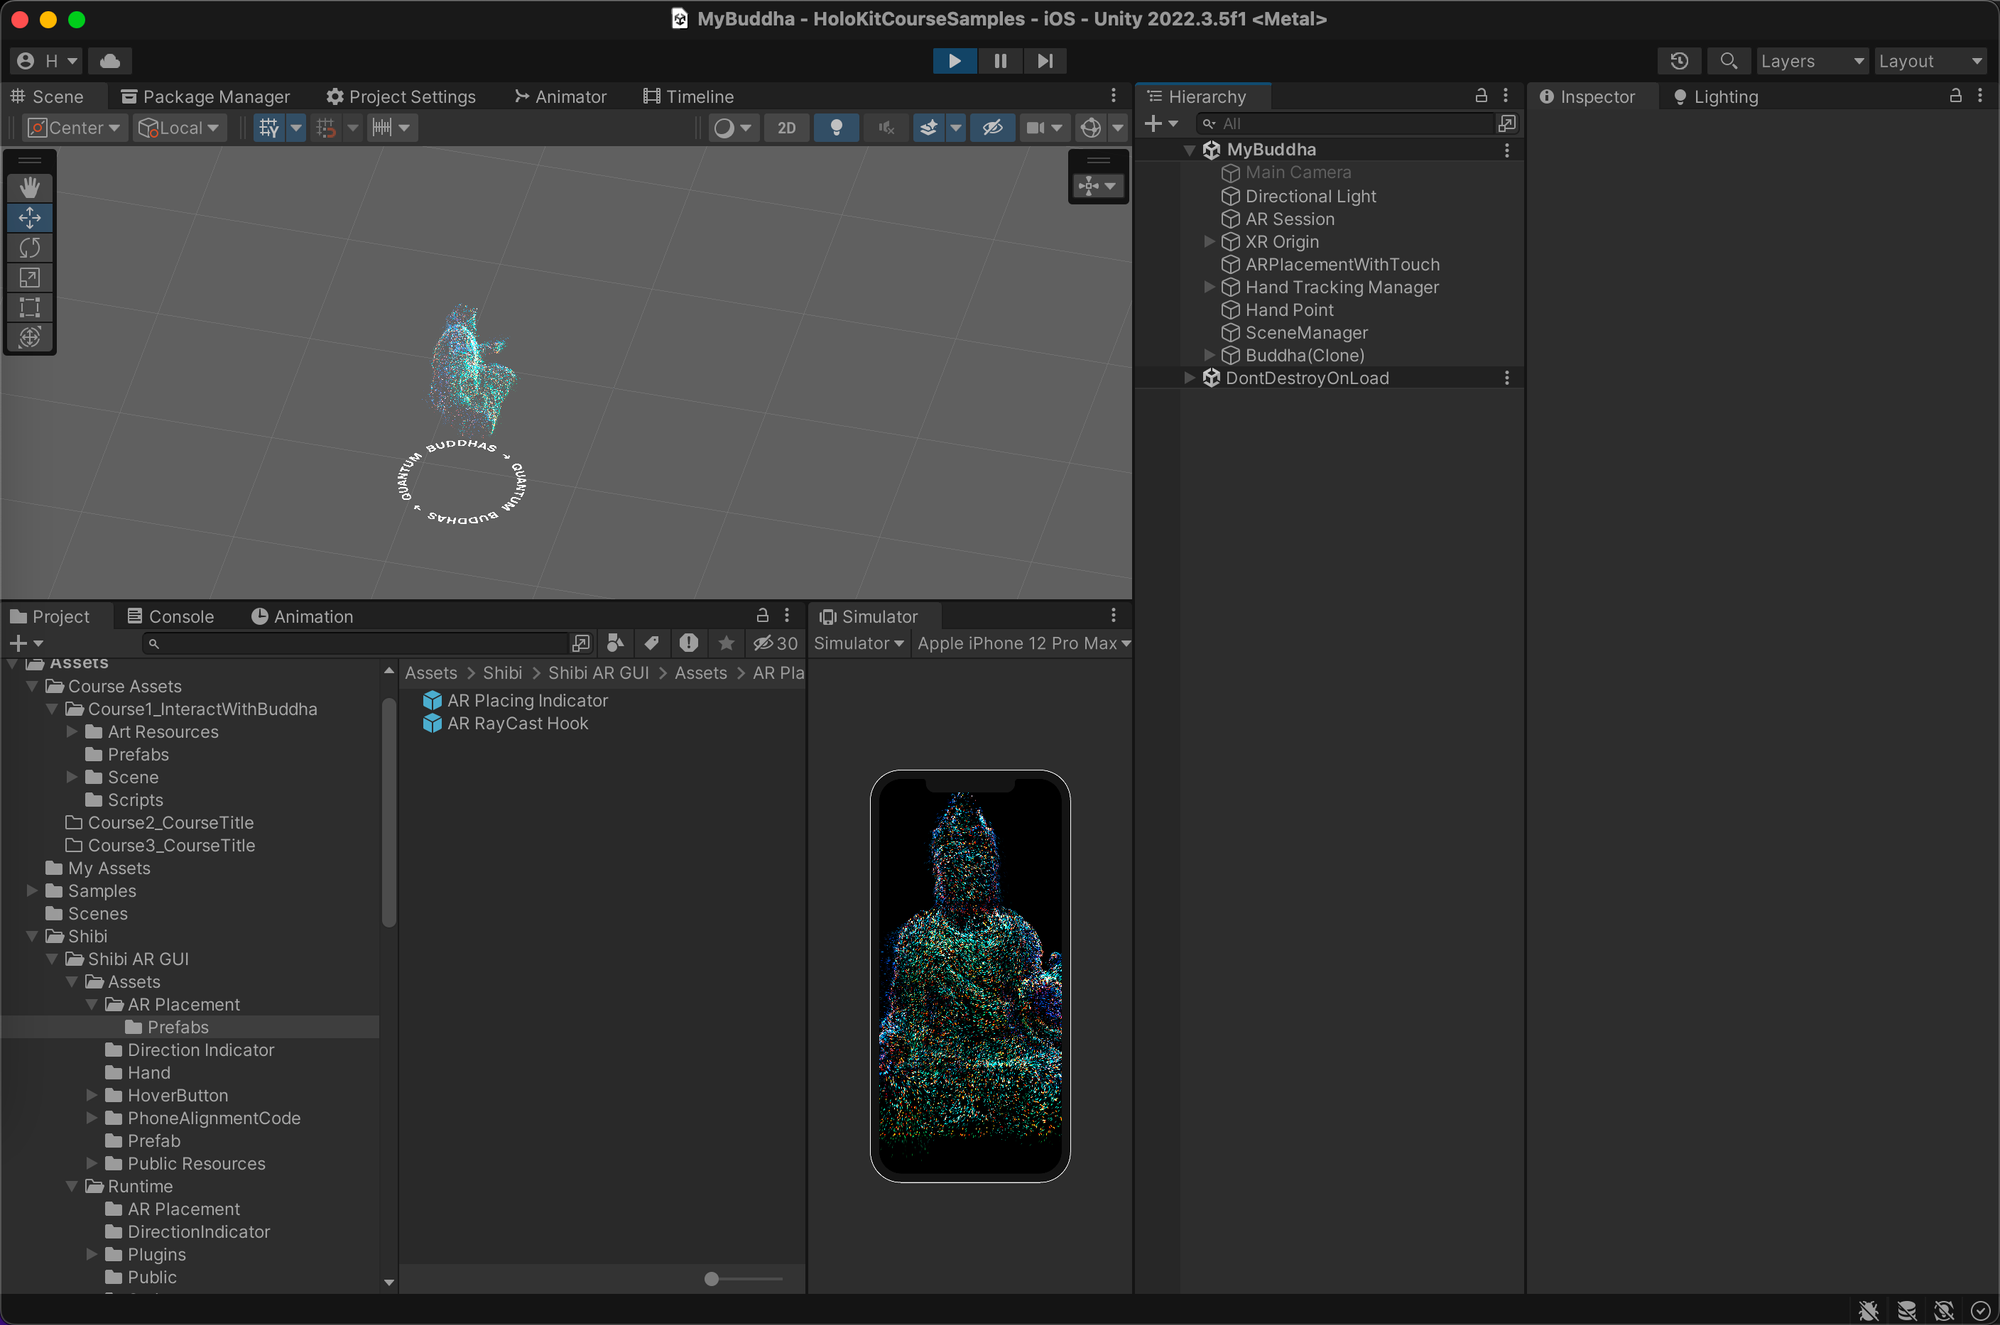
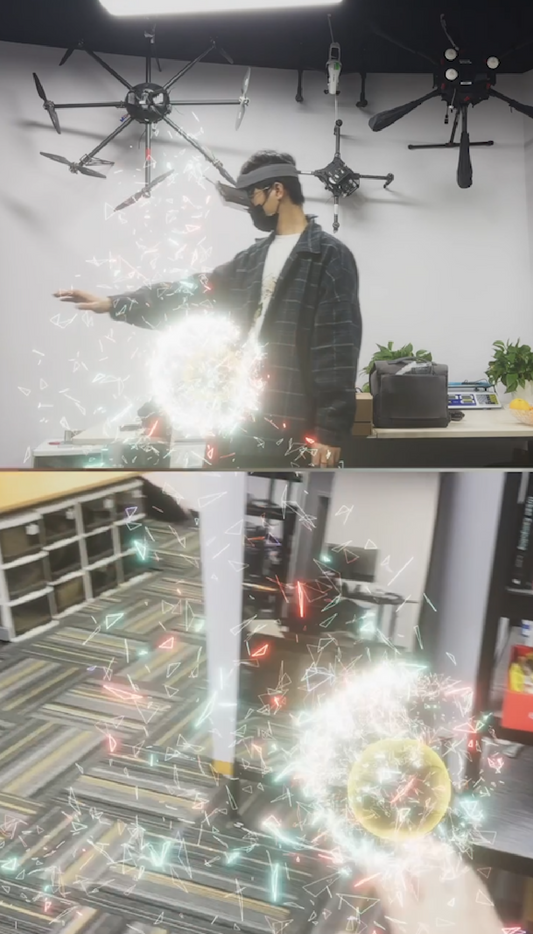
You should observe a vibrant particle-style Buddha being created.
- Try moving the position of the object “MiddleMCP" to get closer to the Buddha and observe the interaction effect.
- Click “Play” icon again to exit Play Mode.
<aside> ⚠️ Please remember that any modifications to objects and object hierarchy within the scene in Play Mode will not be saved.
</aside>
And now we're ready to proceed with building the app and seeing the results on your mobile device!
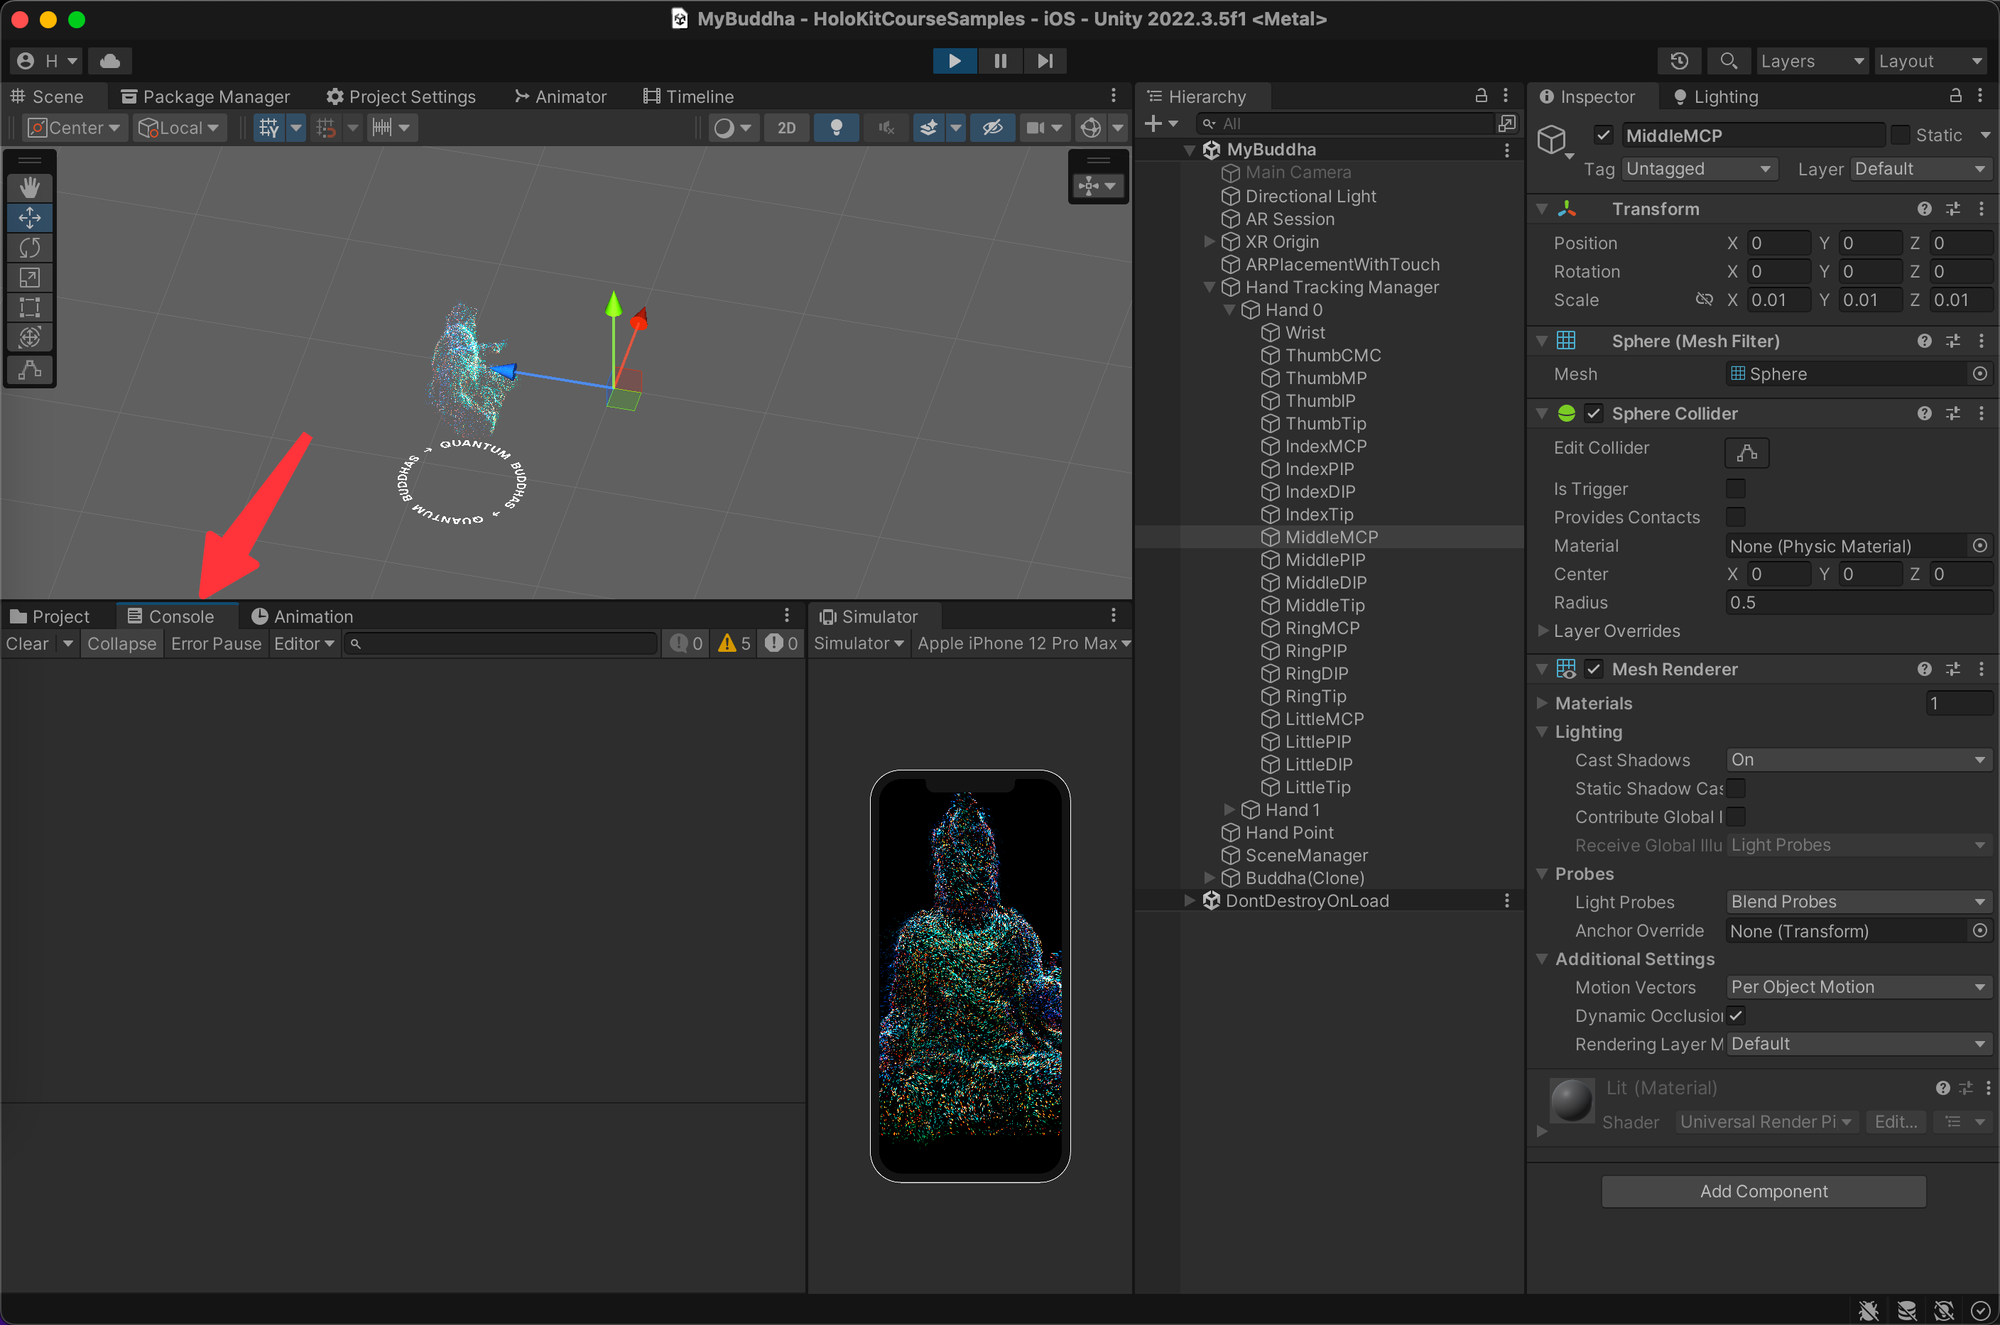
The Console Window is located on the right side of the Project panel. Click on it to switch to Console Window and view the information from console.
Section 9: Building Mobile Applications
-
Open Unity's top menu and navigate to File → Build Settings. You do not need to change any build settings for this project cause we already done this step for you.
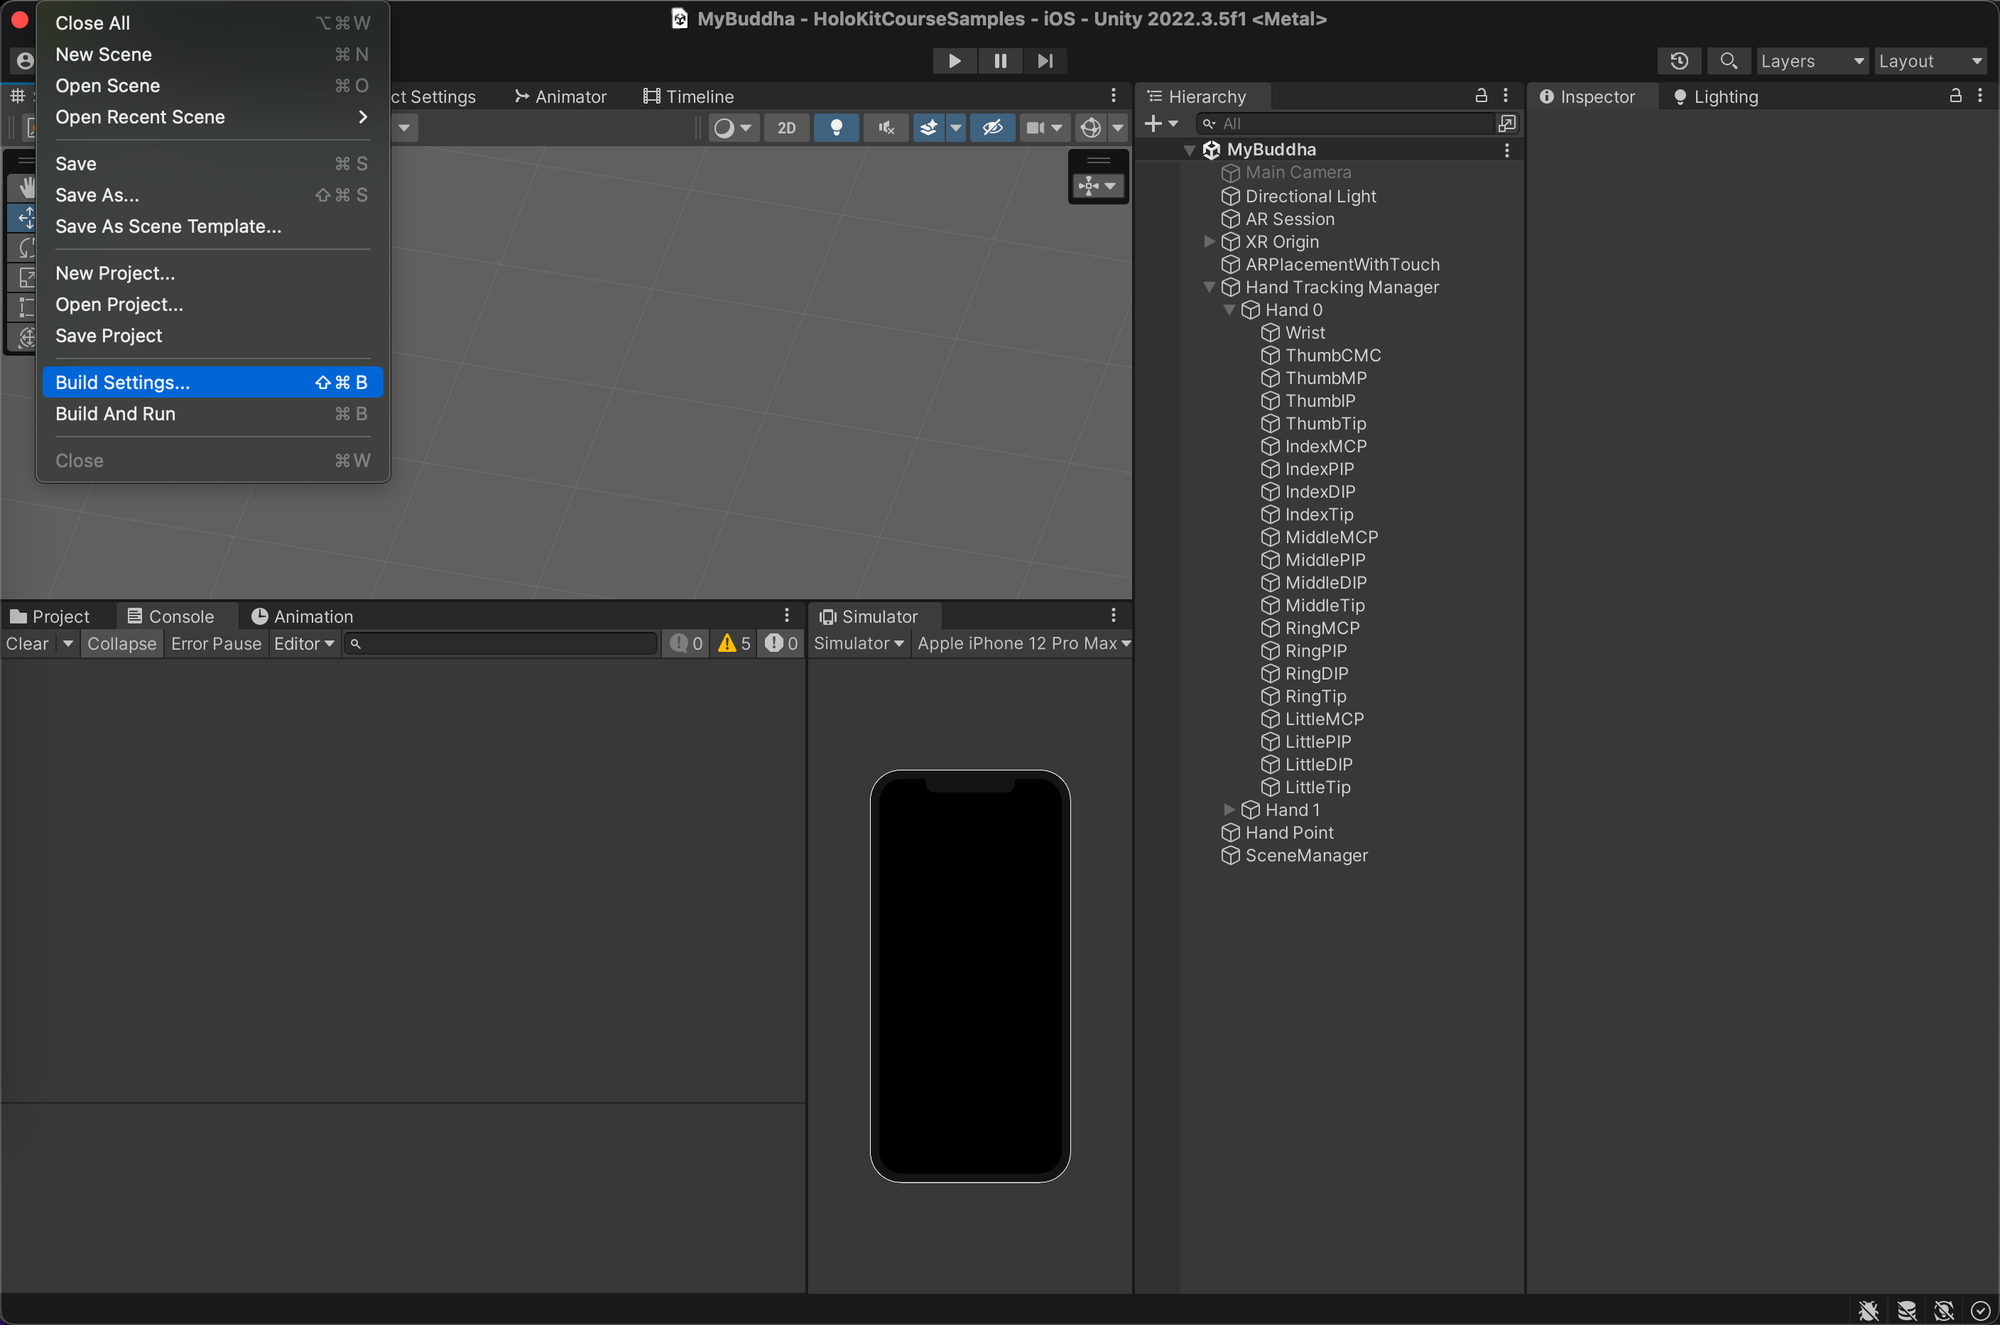
Open Build Settings -
Click on "Add Open Scene" to add the current scene to the list for building the app.
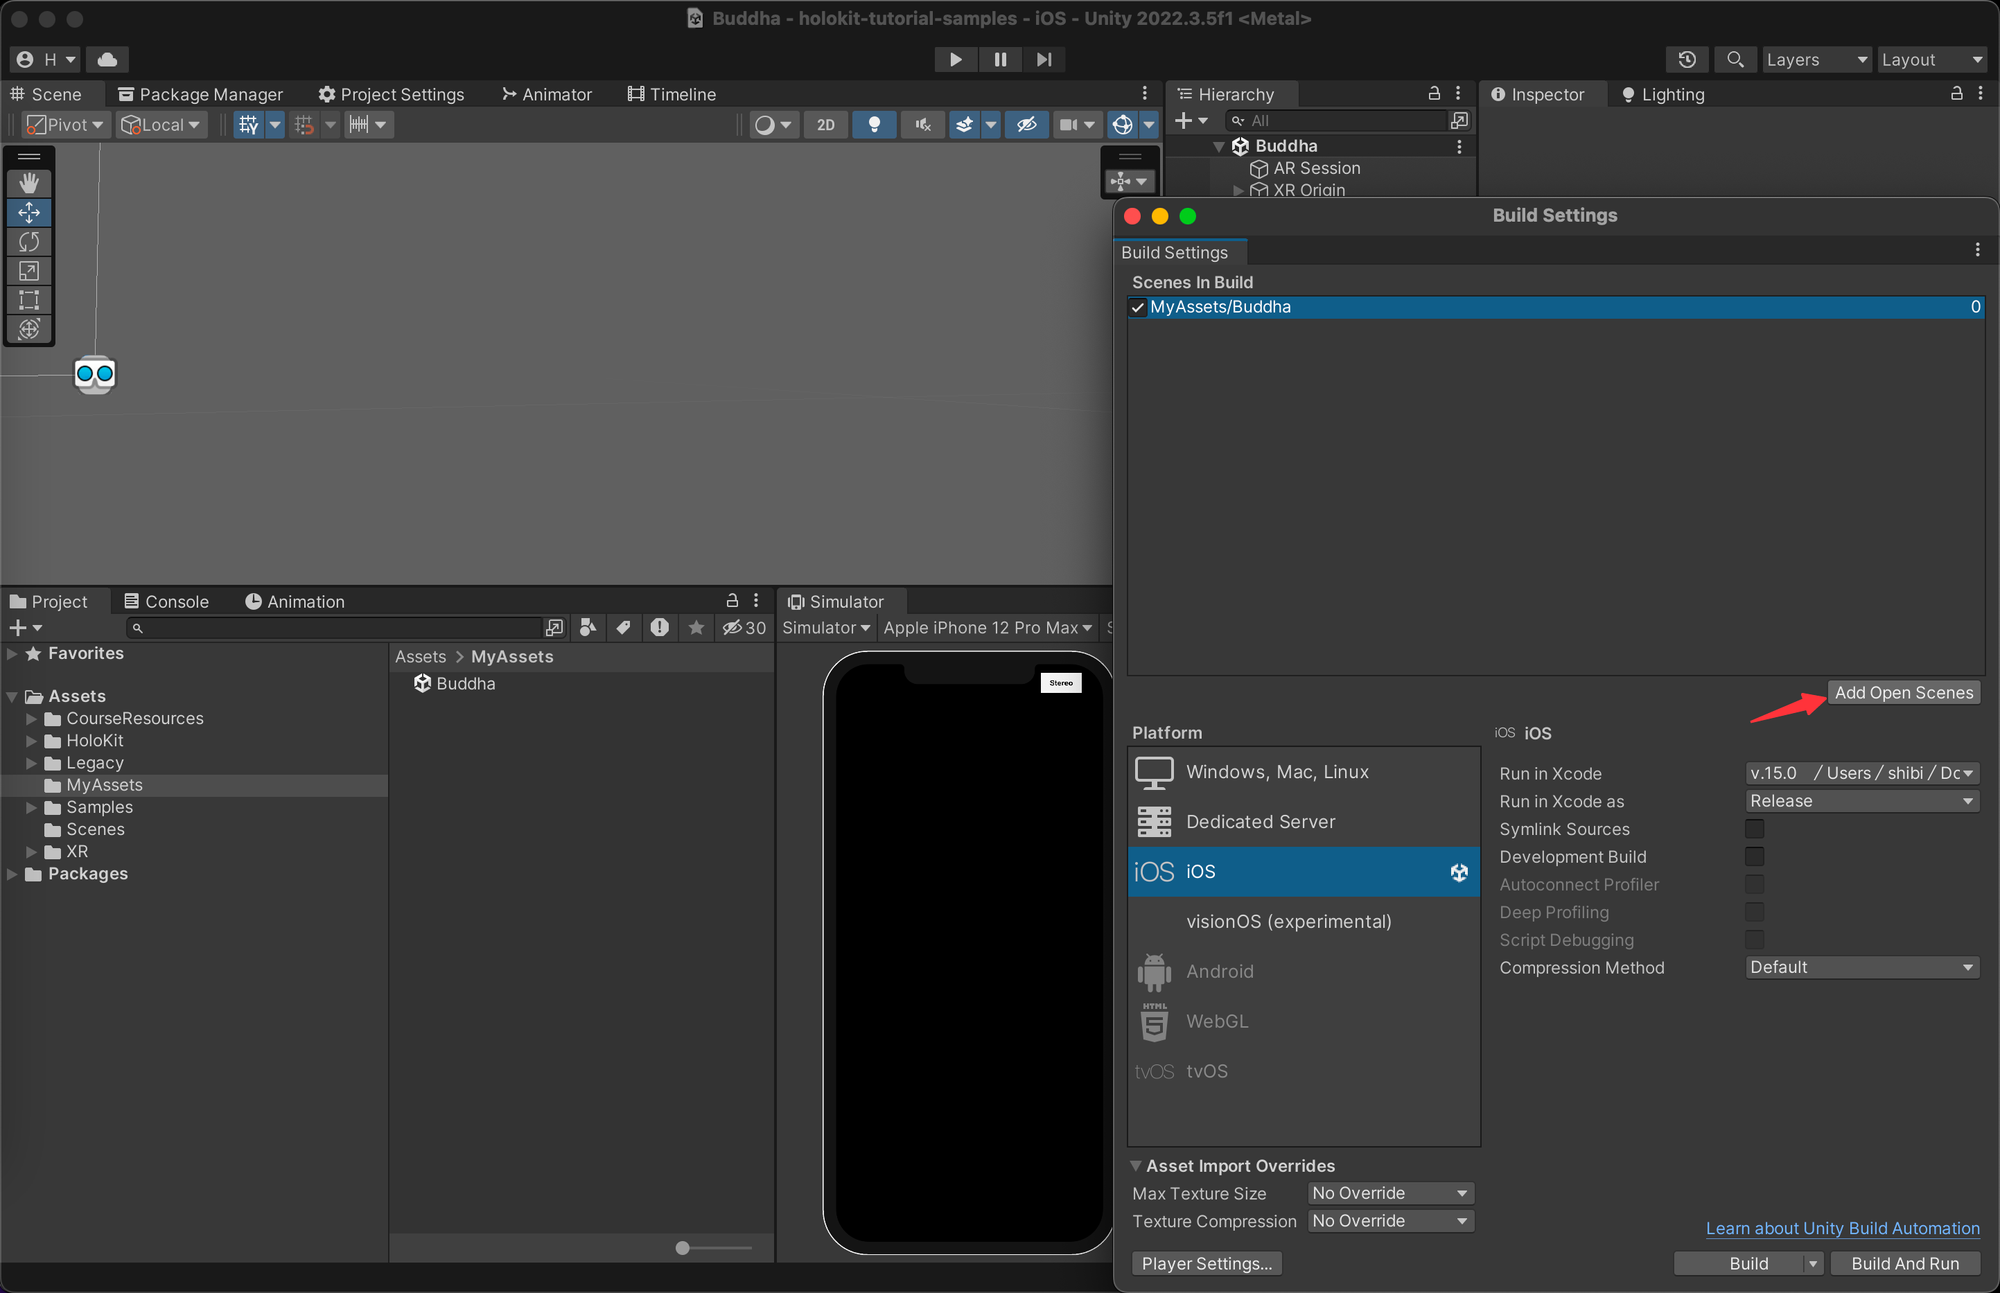
Add Open Scene -
Click on "Build And Run". Ensure that your Xcode configuration is correct and that your iPhone is connected to the computer and is unlocked. Wait for the build to complete.
💡 The distinction between "Build" and "Build And Run":
- The "Build" button creates an Xcode project for you. After that, you need to manually open Xcode, load the project based on the file path, and click "Run" to build the mobile app.
- "Build And Run" combines the aforementioned steps, automatically opening Xcode and building the mobile app. </aside>
After the build completes, the app will automatically open on your phone. Move your phone around, facing different surfaces (floor, walls), and tap the screen to create the Buddha. Try waving your hand near the Buddha to trigger the interactive effect.